In the new Build Enterprise Automation Framework Series, we will look into detailed explanations on creating enterprise test automation frameworks. Many people starting a new position have this particular assignment, so I think it is crucial to understand how to follow all high-quality standards and practices properly. I am not a fan of reinventing the wheel, so I will encourage you to leverage other proven open-source solutions if they can be used and fit your needs instead of writing your own. Leverage the knowledge and expertise of proven experts in the field. If you follow this advice, this series will be highly useful to you again because you will understand how the test automation frameworks are designed, written, and maintained + how to work internally. The information about the subject will be invaluable to you choosing the right tool for your tests. The series can be even more useful to you if you decide to do everything from scratch.
Article by article, we will discuss different aspects and features of the enterprise test automation frameworks. At the end of the course, we will have a full-fledged enterprise test automation framework. The first article from the series will talk not so much about code but rather on how to define what we need (our requirements), how to do research properly- finding the right tools that we will base our framework, and lastly, creating a detailed list of desired characteristics for our solution grouping all of the various features that we will build in the next articles. In the course, I will use as a demo/example our open-source BELLATRIX test automation framework, which I believe is one of the most feature richest open-source frameworks out there.
In the first article from the series “Enterprise Test Automation Framework: Define Requirements and Characteristics”, we defined our future framework’s requirements and qualities/characteristics. This publication will continue with defining more precisely the various features grouped by the previously described characteristics. They will help us to prioritize and plan our work on the framework. We already looked into a few features in part 1. Now we will extend the list further.
5. Easy Knowledge Transfer Features
Everything that your team needs to know, from installation to the most complex features. We can use starter kit demo projects in addition to comprehensive documentation with examples. Also, it is somehow related to the intuitive API design.
Starter Kits
A frequent problem teams face is helping/teaching new members how to write “proper” tests using the team’s framework. Usually, one of most senior people spends countless hours on this process. Starter kits are an automated way allowing new people to learn by themselves. These are projects that have examples with explanations on how to write tests and why we use a particular method or not.
We will look into how to create such starter kits for our new enterprise framework. They will explain the features of the framework with detailed real-world examples. Moreover, they will also contain detailed comments for each part. After each chapter, they will offer exercises that people can do, and this will make them ideal for self-learning. Different features will be grouped in separate folders, and at the end of each chapter, there will be a TODO file containing the exercises.
Rich Documentation
Rich documentation is essential for the success of any open-source project. I will walk you through the process of creating and hosting such documentation using a popular free platform called GitHub Page.
6. Highly Extensible Features
Maybe one of the core characteristics of each framework is its capability to be extended and customized to fit different teams’ needs and be used in various contexts.
Extended Test Execution Life Cycle and Plugins
All test frameworks give you the possibility to execute logic at certain points before or after tests. Typically tests are placed inside test classes. The standard test workflow for MSTest and NUnit is:
The standard test workflow for MSTest and NUnit is:
-
1. Execute Assembly Initialize – once for the whole project
-
2. Execute Class Initialize – once for the test class
-
3. Execute Test Initialize – executed before each test
-
4. Execute Test
-
5. Execute Test Cleanup – executed after each test
-
6. Execute Class Cleanup – once for the test class
-
7. Execute Assembly Cleanup – once for the whole project
Why do you need to extend the standard workflow?
Usually, you want to use these primary methods to execute business test-related logic.
Sample use cases:
-
Take screenshots of test failure
-
Take videos on test failure
-
Fail tests if not executed under a certain time
-
Log test results in a 3rd party system
-
Control the browser life cycle
Our framework should come with an extended test execution life cycle to meet these requirements and support custom plugins. When we write a plugin, we should execute logic in various phases of the new life cycle- before TestInitialize, after TestInitialize, before TestCleanup, after TestCleanup, and more. For each test, all registered plugins logic should be executed.
Our plugin code should be similar to this one.
public class ExecutionTimeUnderTestWorkflowPlugin : TestWorkflowPlugin
{
    protected override void PostTestInit(object sender,
        TestWorkflowPluginEventArgs e)
    {
        // get the start time
    }

    protected override void PostTestCleanup(object sender,
        TestWorkflowPluginEventArgs e)
    {
        // total time = start time - current time
        // IF total time > specified time ===> FAIL TEST
    }
}
In PostTestInit we start a stopwatch. We get the number placed inside the attribute in the PostTestCleanup method. Then stop the stopwatch and compare the actual and specified times. In case first took longer, we fail the test.
Override Globally Element Actions
For example, instead of using our button Click method, use JavaScript to click the button. If we want to change this behavior for all tests, each framework’s UI component should give us this possibility. We will need to initialize the element static delegates- Override{MethodName}Globally.
public static void AssemblyInitialize(TestContext testContext)
{
    Button.OverrideClickGlobally = (e) =>
    {
        e.ToExists().ToBeClickable().WaitToBe();
        App.JavaScriptService.Execute("arguments[0].click();", e);
    };
}
Locally Override Element Actions
This may be useful to make a temporary fix only for a specific page where the default behavior is not working as expected. We will need to initialize the static delegates- Override{MethodName}Locally.
Anchor.OverrideFocusLocally = (e) =>
{
    App.JavaScriptService.Execute("window.focus();");
    App.JavaScriptService.Execute("arguments[0].focus();", anchor);
};
Element Action Hooks
Another way to extend the framework will be to use the controls’ hooks. There will be two hooks for each control’s method- one that is called “before the action” and one “after”.
The available hooks for the button are:
-
Clicking – an event executed before button click
-
Clicked – an event executed after the button is clicked
-
Hovering – an event executed before button hover
-
Hovered – an event executed after the button is hovered
-
Focusing – an event executed before button focus
-
Focused – an event executed after the button is focused
-
Control the browser life cycle
The users will need to implement the event handlers for these events and subscribe to them.
public void ClickingEventHandler(object sender, ElementActionEventArgs arg)
{
    Logger.LogInformation($"Click {arg.Element.ElementName}");
}

public void HoveringEventHandler(object sender, ElementActionEventArgs arg)
{
    Logger.LogInformation($"Hover {arg.Element.ElementName}");
}
Common Services Action Hooks
Another way to extend the framework will be to use hooks for its common services. Here is a list of some common services events we can add: NavigationService – UrlNotNavigatedEvent, called if the WaitForPartialUrl throws an exception ElementWaitService – OnElementNotFulfillingWaitConditionEvent, called if the Wait method throws an exception.
public static void OnElementNotFound(object sender, ExceptionEventArgs args)
{
    var exceptionAnalyser = new ExceptionAnalyser();
    exceptionAnalyser.Analyse(args.Exception);
    throw args.Exception;
}
Extend Existing UI Components
One way to extend an existing element will be to create an extension method for additional action.
public static class ButtonExtensions
{
    public static void SubmitButtonWithEnter(this Button button)
    {
        var action = new Actions(button.WrappedDriver);
        action.MoveToElement(button.WrappedElement)
            .SendKeys(Keys.Enter)
            .Perform();
    }
}
The second way of extending an existing element will be to create a child element. We will have to inherit the UI component that we want to extend.
public class ExtendedButton : Button
{
    public void SubmitButtonWithEnter()
    {
        var action = new Actions(WrappedDriver);
        action.MoveToElement(WrappedElement)
            .SendKeys(Keys.Enter)
            .Perform();
    }
}
Extend Common Services
We can add the ability to add a new method to the framework’s common services - for example, a new special way of navigating or custom logic for handling dialog alerts.
Note: the common services are special classes that we will build that will split the IWebDriver interfaces into more specialized units responsible for various tasks such as working with cookies, handling alerts, finding elements, browser operations, etc.
To extend the common services, we will need to create an extension method for additional action.
public static class NavigationServiceExtensions
{
    public static void NavigateViaJavaScript(
        this NavigationService navigationService,
        string url)
    {
        var javaScriptService = new JavaScriptService();
        javaScriptService.Execute($"window.location.href = '{url}';");
    }
}
Add New Find Locators
It will be great if we have a way to add new custom more advanced find locators.
public class ByIdEndingWith : By
{
    public ByIdEndingWith(string value): base(value) {}
    public override OpenQA.Selenium.By Convert()
            => OpenQA.Selenium.By.CssSelector($"[id^='{Value}']");
}
In the Convert method, we use a standard WebDriver By locator, and in this case we implement our requirements through a little CSS.
7. Troubleshooting Easiness Features
With the increasing test count and complexity, it will be even more critical that the tests are more maintainable. A significant part of this effort is easier troubleshooting and better support for locating errors.
Full-page Screenshot on Test Failure
One of the best ways to detect what was the cause of the test failure is to see a screenshot of the web page at that moment. At least 50% of the time, action is happening in the invisible part of the screen since the web pages are more than one screen long. We can reuse a logic I already presented- Capture Full Page Screenshots Using WebDriver with HTML2Canvas.js
We can create a plug-in similar to the one for reusing the browser but instead mentioning whether we want a screenshot or not.
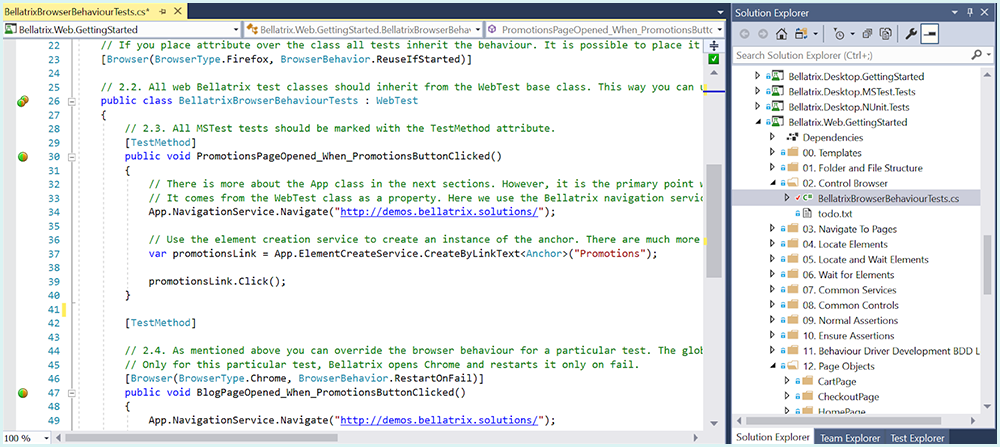
[ScreenshotOnFail(true)]
[Browser(BrowserType.Chrome, BrowserBehavior.ReuseIfStarted)]
public class FullPageScreenshotsOnFailTests : WebTest
{

    public void PromotionsPageOpened_When_PromotionsButtonClicked()
    {
        App.NavigationService.Navigate("http://demos.bellatrix.solutions/");
        var promotionsLink =
            App.ElementCreateService.CreateByLinkText<Anchor>("Promotions");
        promotionsLink.Click();
    }
}
Video on Test Failure
Another great way to see what was the cause of test failure is to watch a video of the whole test execution. We can create a similar plug-in to the one for the screenshots on failure. We can reuse another solution that I already shared with you - Full-Stack Test Automation Frameworks- Video Recording on Test Failure
Also, it will be awesome if we can highlight the current element in use. To do this, we can use the JavaScript solution from this article - Highlight Elements on Action- Test Automation Framework Extensibility through Observer Design Pattern.
[VideoRecording(VideoRecordingMode.OnlyFail)]
[Browser(BrowserType.Chrome, BrowserBehavior.ReuseIfStarted)]
public class VideoRecordingTests : WebTest
{

    public void PromotionsPageOpened_When_PromotionsButtonClicked()
    {
        App.NavigationService.Navigate("http://demos.bellatrix.solutions/");
        var promotionsLink =
            App.ElementCreateService.CreateByLinkText <Anchor>("Promotions");
        promotionsLink.Click();
    }
}
Measure Test Execution Times
Sometimes, it is useful to use the functional tests to measure performance or make sure that it is not slow. Our framework can offer a new attribute called ExecutionTimeUnder attribute, whereby you specify a timeout. If the test is executed over it, the test fails.
[ExecutionTimeUnder(2)]
public class MeasuredResponseTimesTests : WebTest
Built-in Test Failure Analysis
Detect if there is a problem in the test or a bug in the system without looking into the code or debugging.
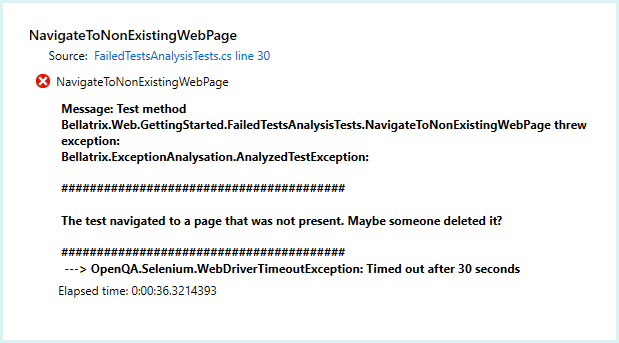
We can reuse yet another previously proposed tooling which uses the Chain of Responsibility design pattern - Failed Tests Аnalysis- Chain of Responsibility Design Pattern.
In the next article, we will continue describing the features part of the “Unified Team Conventions Features”, “Seamlessly Integration with Existing Tools and Processes Features”, “Advanced Scenarios Support Features” characteristics. Also, you can download the full source code of open-source test automation BELLATRIX from the below button. It is one of the feature richest frameworks out there that are free. It supports web, mobile, API, desktop, and load testing. We will use it in all of the next articles as a showcase. So, I encourage you to download it, start playing with it, debugging, and looking into the code.