
In this article from the series Automation Tools, I am going to guide you on how you can set up a GitHub Actions job for a Selenium Java project, run your Selenium tests, and display the report with the test results, all that without ever leaving the GitHub website.
What Is GitHub Actions?
GitHub Actions is one of the most recent workflow mechanisms that are quick and easy to set up directly from the GitHub repository. It allows building CI/CD pipelines for testing, releasing, and deploying software without third-party platforms. It has hosted runners for every major OS (Windows, macOS, Linux), or you can directly run it on a VM or inside a container. It’s entirely free for public repositories, and the free plan for private repositories includes 2000 minutes per month.
Why Do You Need CI/CD?
Definition
CI/CD, short for Continuous Integration and Continuous Delivery/Deployment, is a collection of practices and operating principles that enable teams to deliver code changes more frequently and reliably. The implementation is usually called CI/CD pipeline
Note
Continuous Integration establishes a consistent automated way of building, packaging, and testing applications. This helps teams deliver code changes more frequently, which improves collaboration and software quality.
Note
Continuous Delivery starts where Continuous Integration ends. It automates the delivery of applications to selected environments. For example, teams usually work on multiple environments (development, testing, staging, production), and Continuous Delivery helps with an automated way to push code changes to them.
The logic behind using such principles is, so teams commit smaller code changes more frequently. Continuous Integration usually checks if the code builds and the tests run successfully on each commit to the repository, so it’s easier to identify defects earlier and improve software quality. Continuous Deployment helps those changes get to the production environment seamlessly when all the tests have been carried out.
Setting Up The Tests
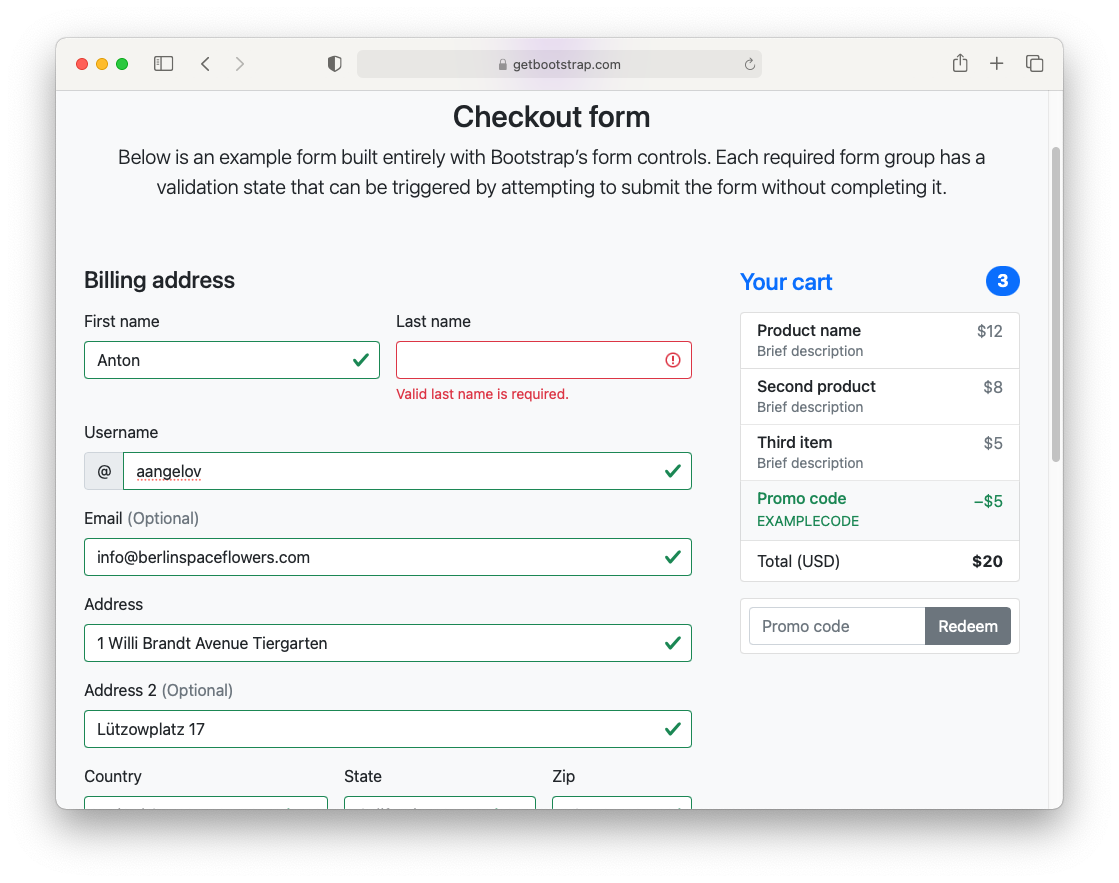
In the example, we’re going to build a simple Maven project with Java, which will test the proper validation of the fields of Bootstrap 5’s example Checkout form. We’re checking if the appropriate error message is displayed on each required field, if it is empty when submitting and if the form submits if all the fields have valid info.
We’re not going to go into much detail about writing the test, as this isn’t the point of this article. You can download the source code from the bottom of the page. Here’s the test class we’re going to execute:
public class CheckoutTests {
  public WebDriver driver;
  public CheckoutPage page;

  @BeforeAll
  public static void classInit() {
    WebDriverManager.chromedriver().setup();
  }

  @BeforeEach
  public void testInit() {
    ChromeOptions options = new ChromeOptions();
    options.addArguments("--headless");
    driver = new ChromeDriver(options);
    page = new CheckoutPage(driver);
    page.navigate();
  }

  @AfterEach
  public void testCleanup() {
    driver.quit();
  }

  @Test
  public void formSent_When_InfoValid() {
      var clientInfo = new ClientInfo();
      clientInfo.setFirstName("Anton");
      clientInfo.setLastName("Angelov");
      clientInfo.setUsername("aangelov");
      clientInfo.setEmail("info@berlinspaceflowers.com");
      clientInfo.setAddress1("1 Willi Brandt Avenue Tiergarten");
      clientInfo.setAddress2("Lützowplatz 17");
      clientInfo.setCountry(1);
      clientInfo.setState(1);
      clientInfo.setZip("10115");
      clientInfo.setCardName("Anton Angelov");
      clientInfo.setCardNumber("1234567890123456");
      clientInfo.setCardExpiration("12/23");
      clientInfo.setCardCVV("123");
      page.fillInfo(clientInfo);
      page.assertions().formSent();
    }

  @Test
  public void validatedCardCVV_When_CardCVVNotSet() {
    var clientInfo = new ClientInfo();
    clientInfo.setFirstName("Anton");
    clientInfo.setLastName("Angelov");
    clientInfo.setUsername("aangelov");
    clientInfo.setEmail("infoberlinspaceflowers.com");
    clientInfo.setAddress1("1 Willi Brandt Avenue Tiergarten");
    clientInfo.setAddress2("Lützowplatz 17");
    clientInfo.setCountry(1);
    clientInfo.setState(1);
    clientInfo.setZip("10115");
    clientInfo.setCardName("Anton Angelov");
    clientInfo.setCardNumber("1234567890123456");
    clientInfo.setCardExpiration("12/23");
    clientInfo.setCardCVV("");
    page.fillInfo(clientInfo);
    page.assertions().validatedCardCVV();
  }
}
Note
We’re setting up Chrome to run in the headless mode because the runners don’t display output and will probably crash the driver.
After you have the Maven project set up with all the tests and verified that they’re working, we’re adding the maven-surefire-plugin to the POM.xml to run the tests through the command line. Next, go to the project’s root using CMD/Terminal and write mvn clean test to clean the project’s generated files, compile the project and run the tests (note that test carries the additional tasks needed such as compilation). If everything goes as expected, you should have a folder called “surefire-reports” with a .xml file with the results under the “target” folder. We’re going to need it later when we’re configuring the reporting.
Getting Started with GitHub Actions
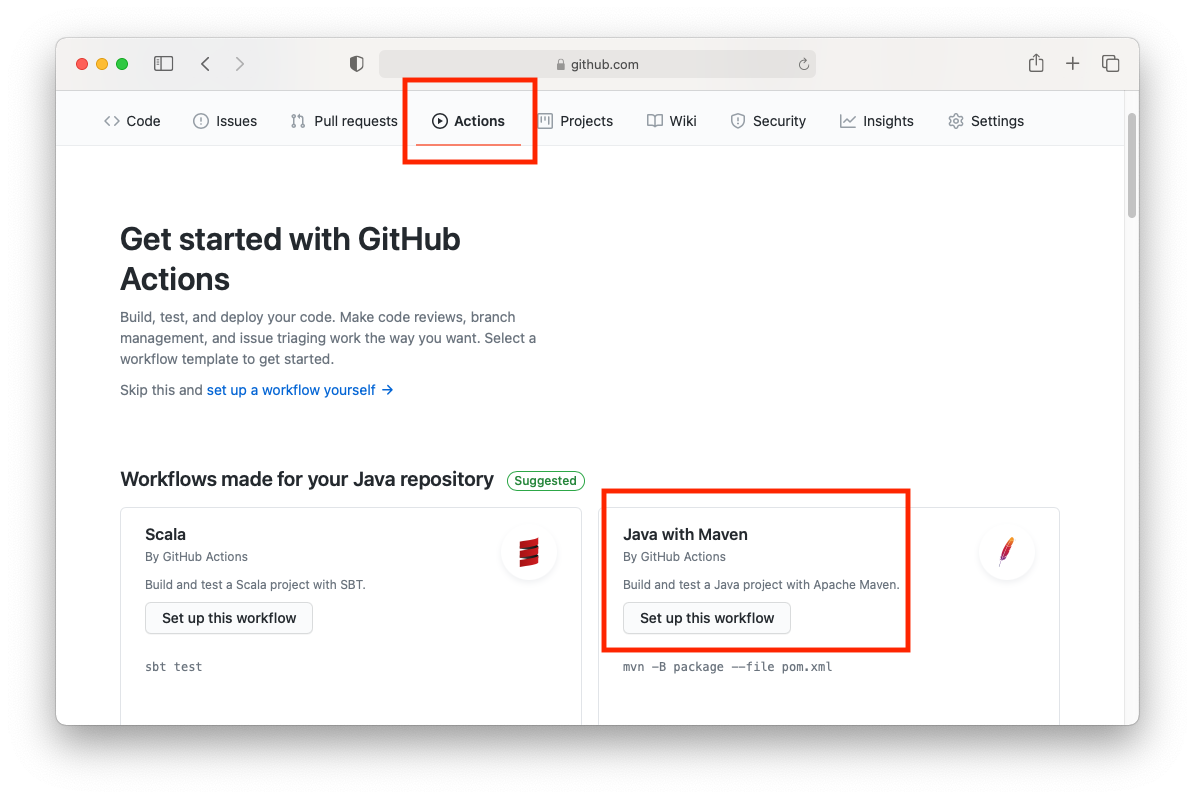
After committing the project to a repository in GitHub, go to the “Actions” tab (top red square) in that repository and choose “Set up this workflow” in the “Java with Maven” box (bottom red square):
You’ll be greeted with the workflow configuration file with additional actions you can choose from on the right. You’ll notice that it’s configured to run on the latest Ubuntu, and it has a step for configuring JDK 11:
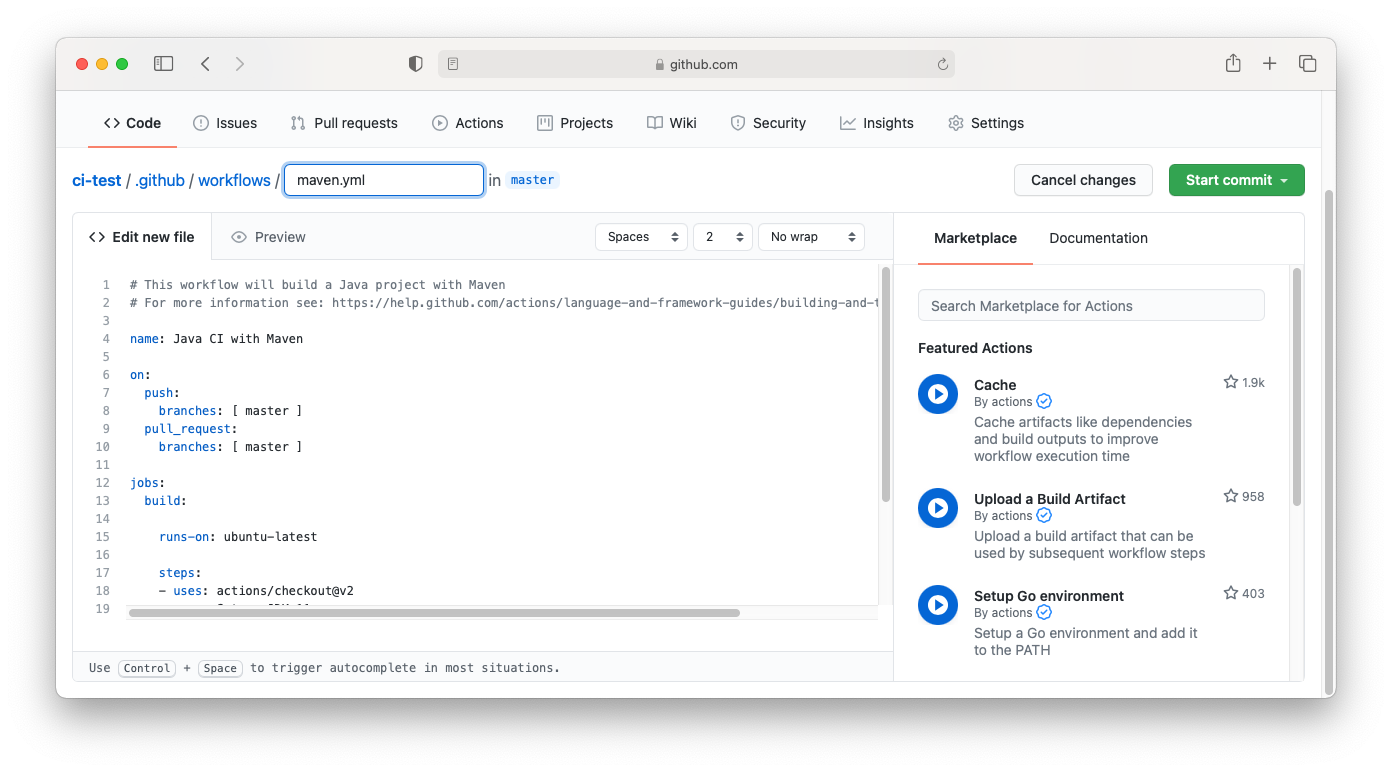
Since our tests are written using JDK 15, we’ll change the Java version from 11 to 15. At the bottom, we’ll swap the Maven command with mvn clean test. By default, it’s configured to execute the workflow on every push or pull request. This means we can’t manually run it unless we add workflow_dispatch hook under on: Note that this is .yml file, and whitespaces are important. Here’s what we’re left with:
name: Java CI with Maven
"on": null
workflow_dispatch: null
push: null
branches:
- master
pull_request: null
branches:
- master
jobs: null
build: null
runs-on: ubuntu-latest
steps:
- uses: actions/checkout@v2
- name: Set up JDK 15
uses: actions/setup-java@v2
with: null
java-version: '15'
distribution: adopt
- name: Build with Maven
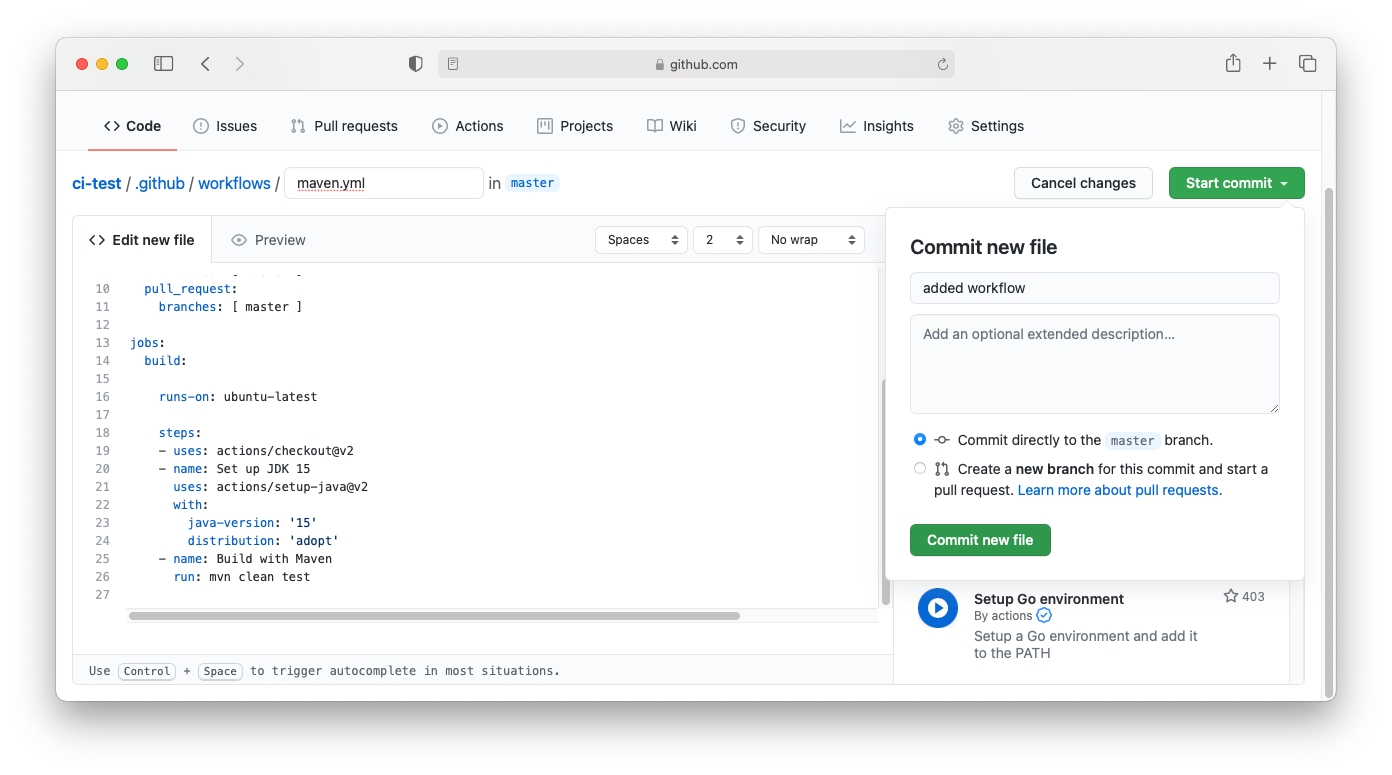
run: mvn clean testWhen you’re done with the changes, press the green “Start commit” button and commit the new file:
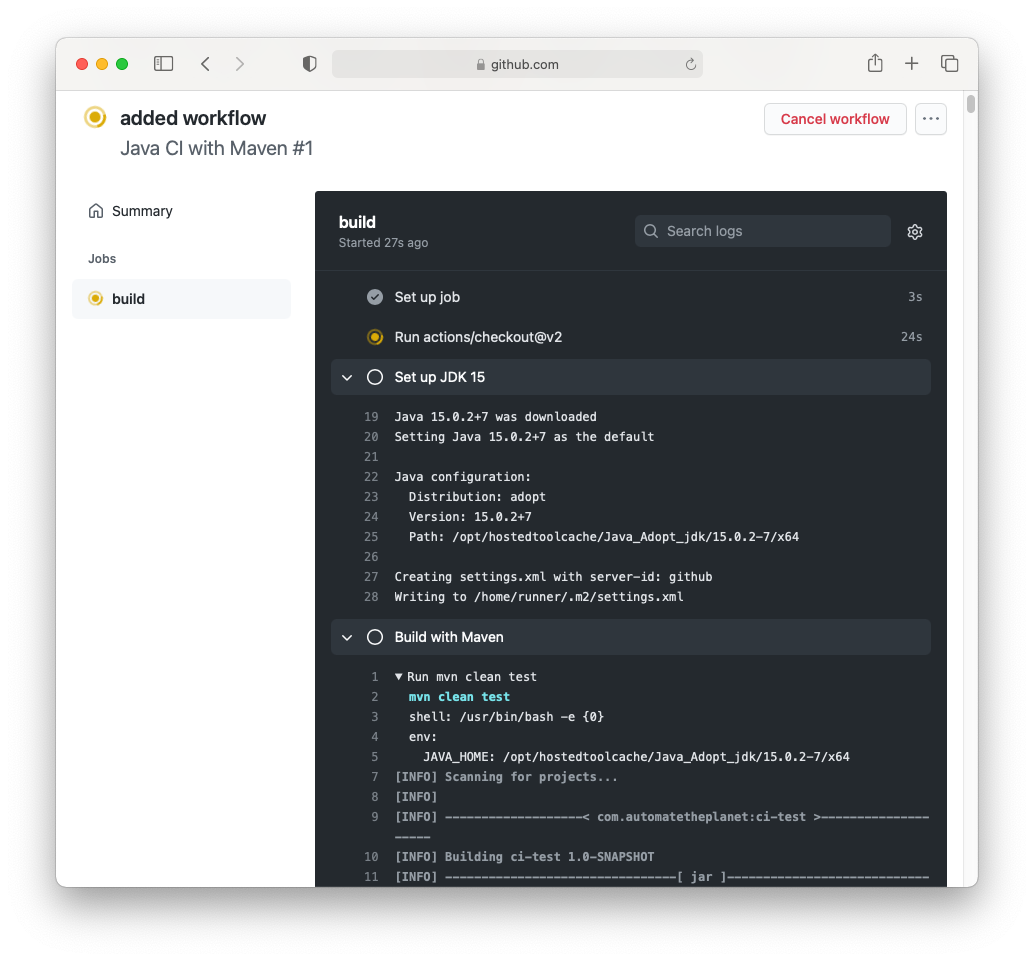
That’s all you need to get started. When you go to the “Actions” tab now, you’ll notice that there’s a job that’s set up, and it’s probably already executing. You can click on it to see the live console output:
Configuring the Reporting Action
To edit the workflow configuration, you must go to the
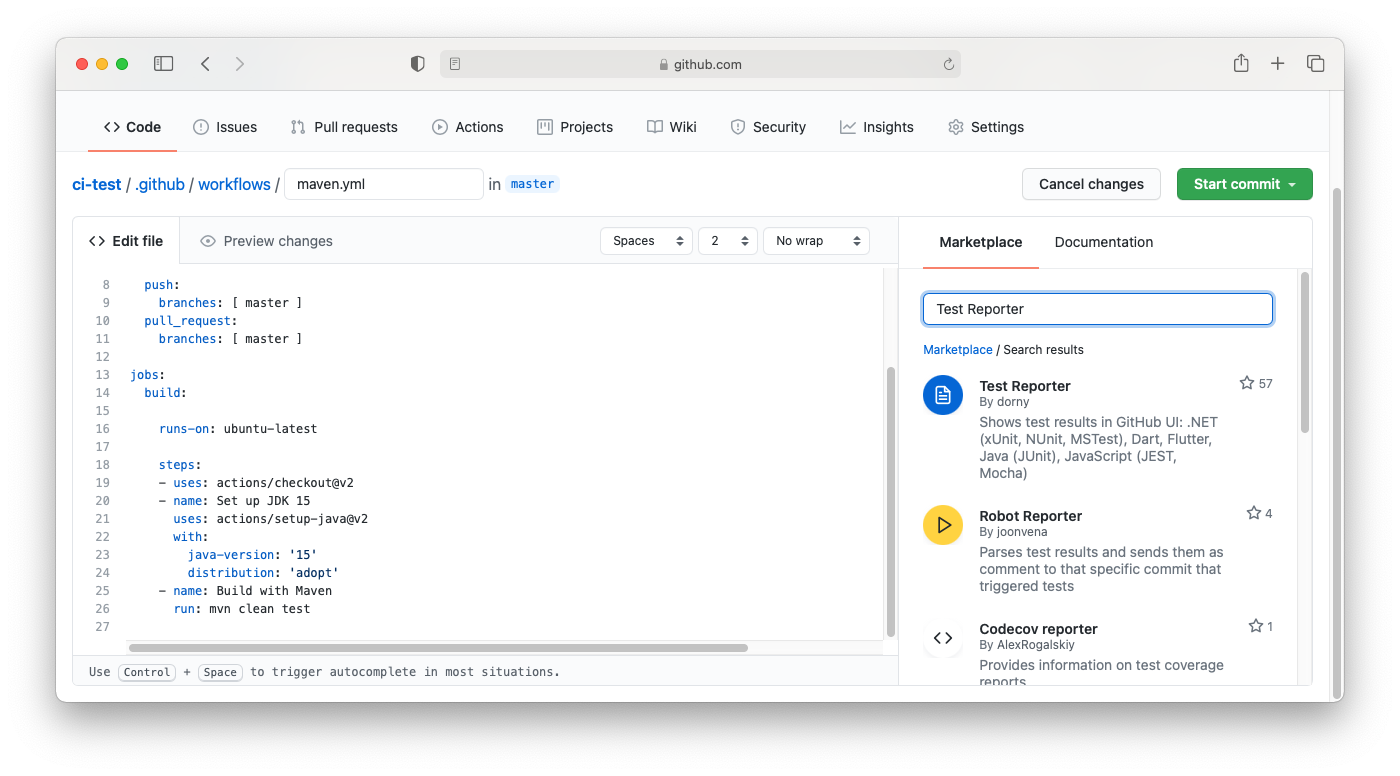
To edit the workflow configuration, you must go to the
name: Test Reporter
uses: dorny/test-reporter@v1.4.3
with:
name: Run Tests
path: "**/surefire-reports/TEST-*.xml"
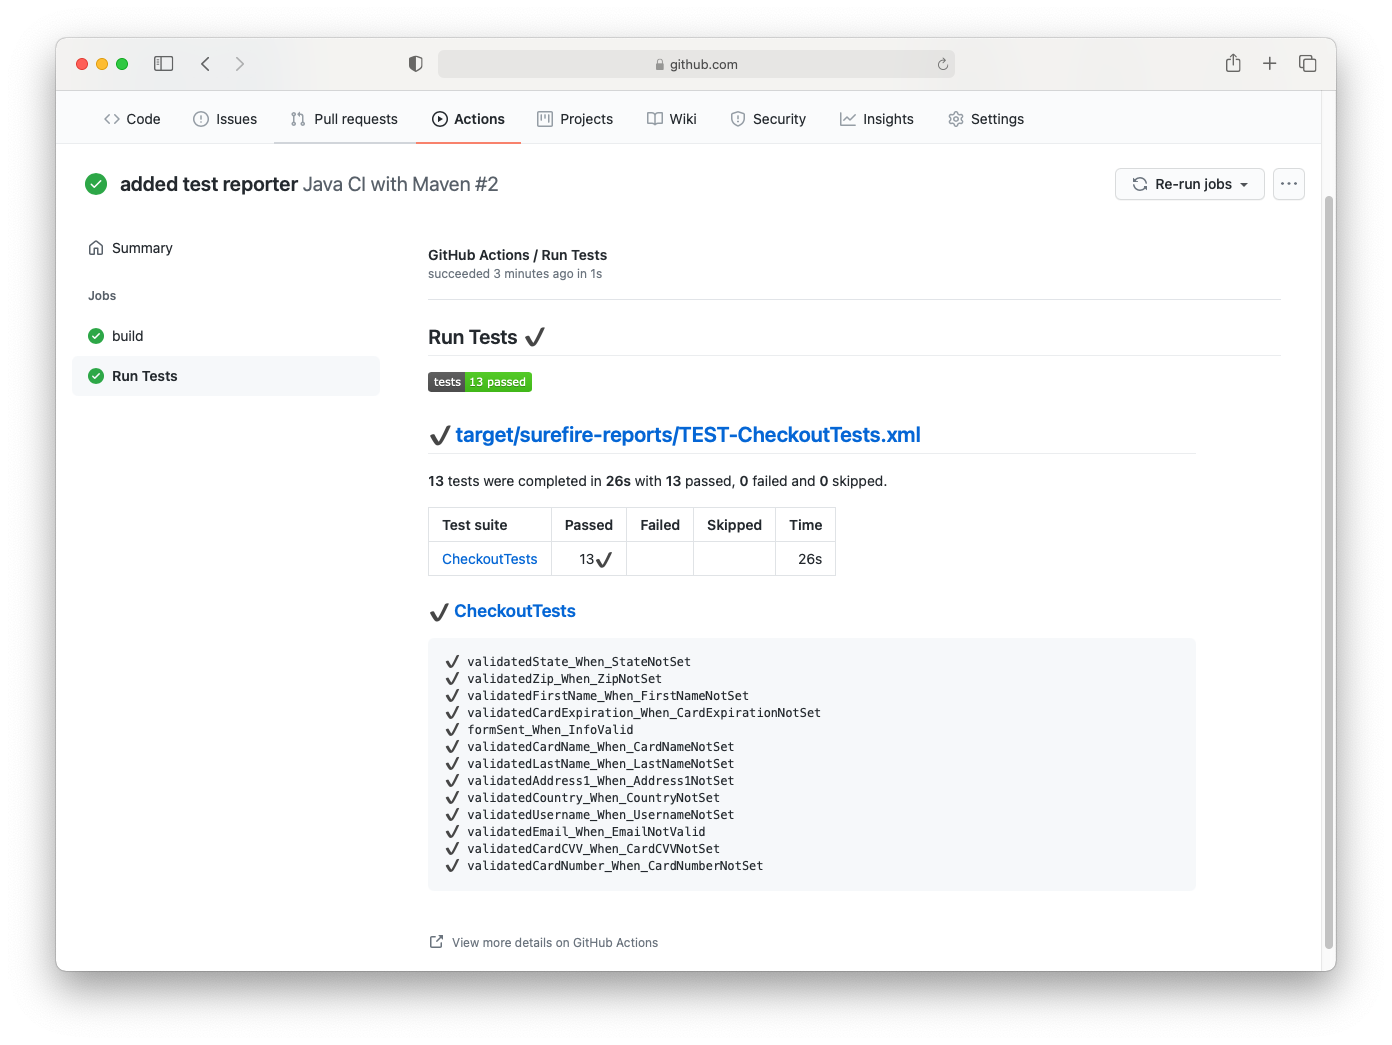
reporter: java-junitAfter running the new workflow, you’ll notice that under “Jobs”, there’s a new section called “Run Tests” under “Jobs”. It will generate a page with the reports of all the .xml files included in the “path” section. Here’s how it looks like if all the tests have passed successfully:
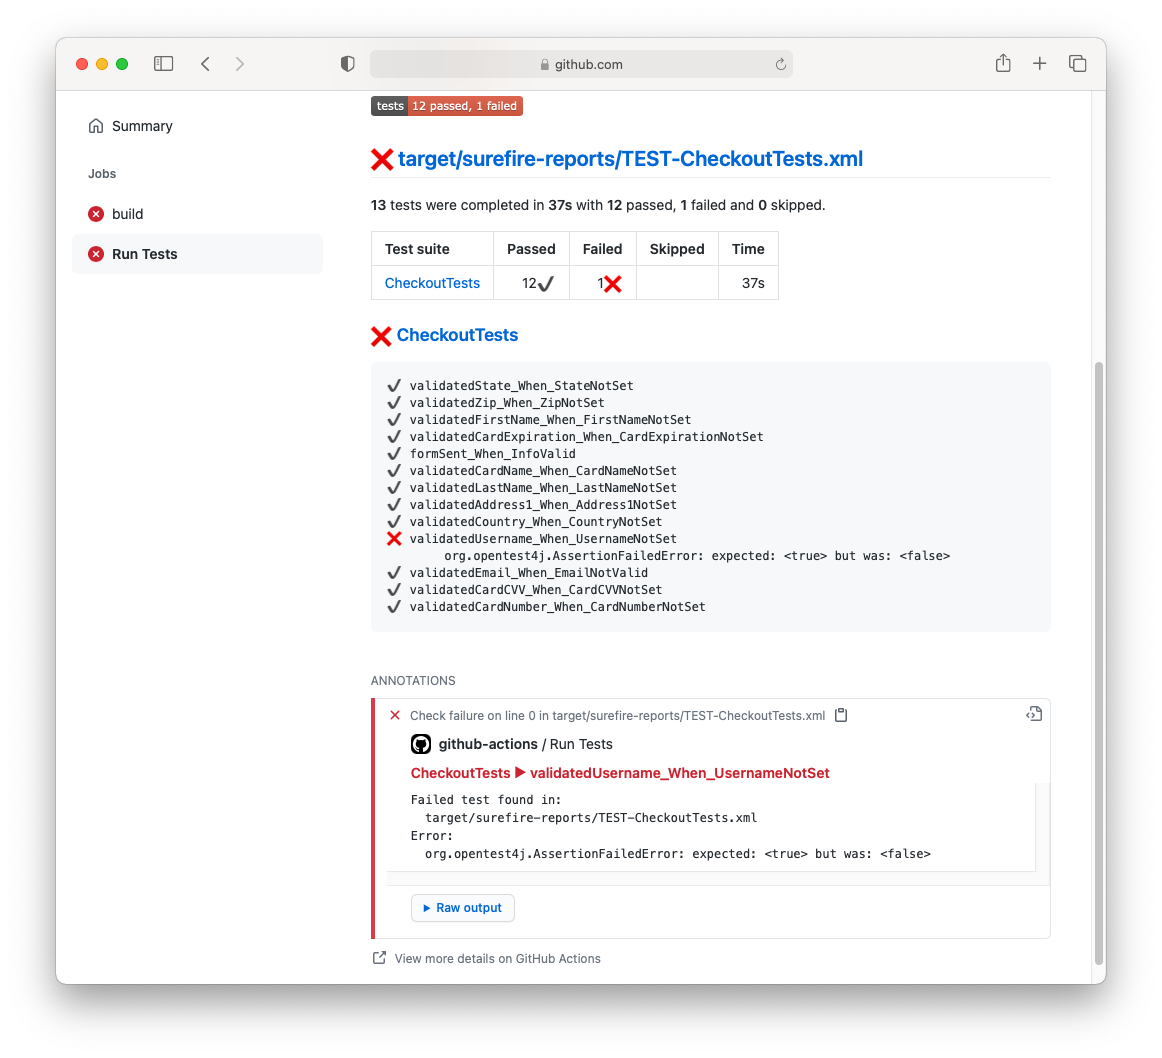
And here’s how the report looks like when you have a failed test:
Summary
GitHub Actions is one of the most recent workflow mechanisms that are quick and easy to set up directly from the GitHub website. It allows building CI/CD pipelines for testing, releasing, and deploying software without third-party platforms. It has hosted runners for every major OS, or you can use your own hosted runner with it. It’s free for all public repositories and has a free plan for private ones.