
Introduction
In this post, we will go through the basics of shadow DOM, its use, benefits, and constraints, and we will analyse the solution for them. As an Automation Engineer, one might have already encountered shadow DOM and might have encountered constraints with automating elements in it. Furthermore, some of the elements might have proven to be impossible for location using contemporary automation tools. For example, the browser automation tool Selenium or the web testing and automation framework Playwright. These two will be the only tools we will go through in this post. Read further to learn about a solution for XPath usage in shadow DOM.
What is Shadow DOM
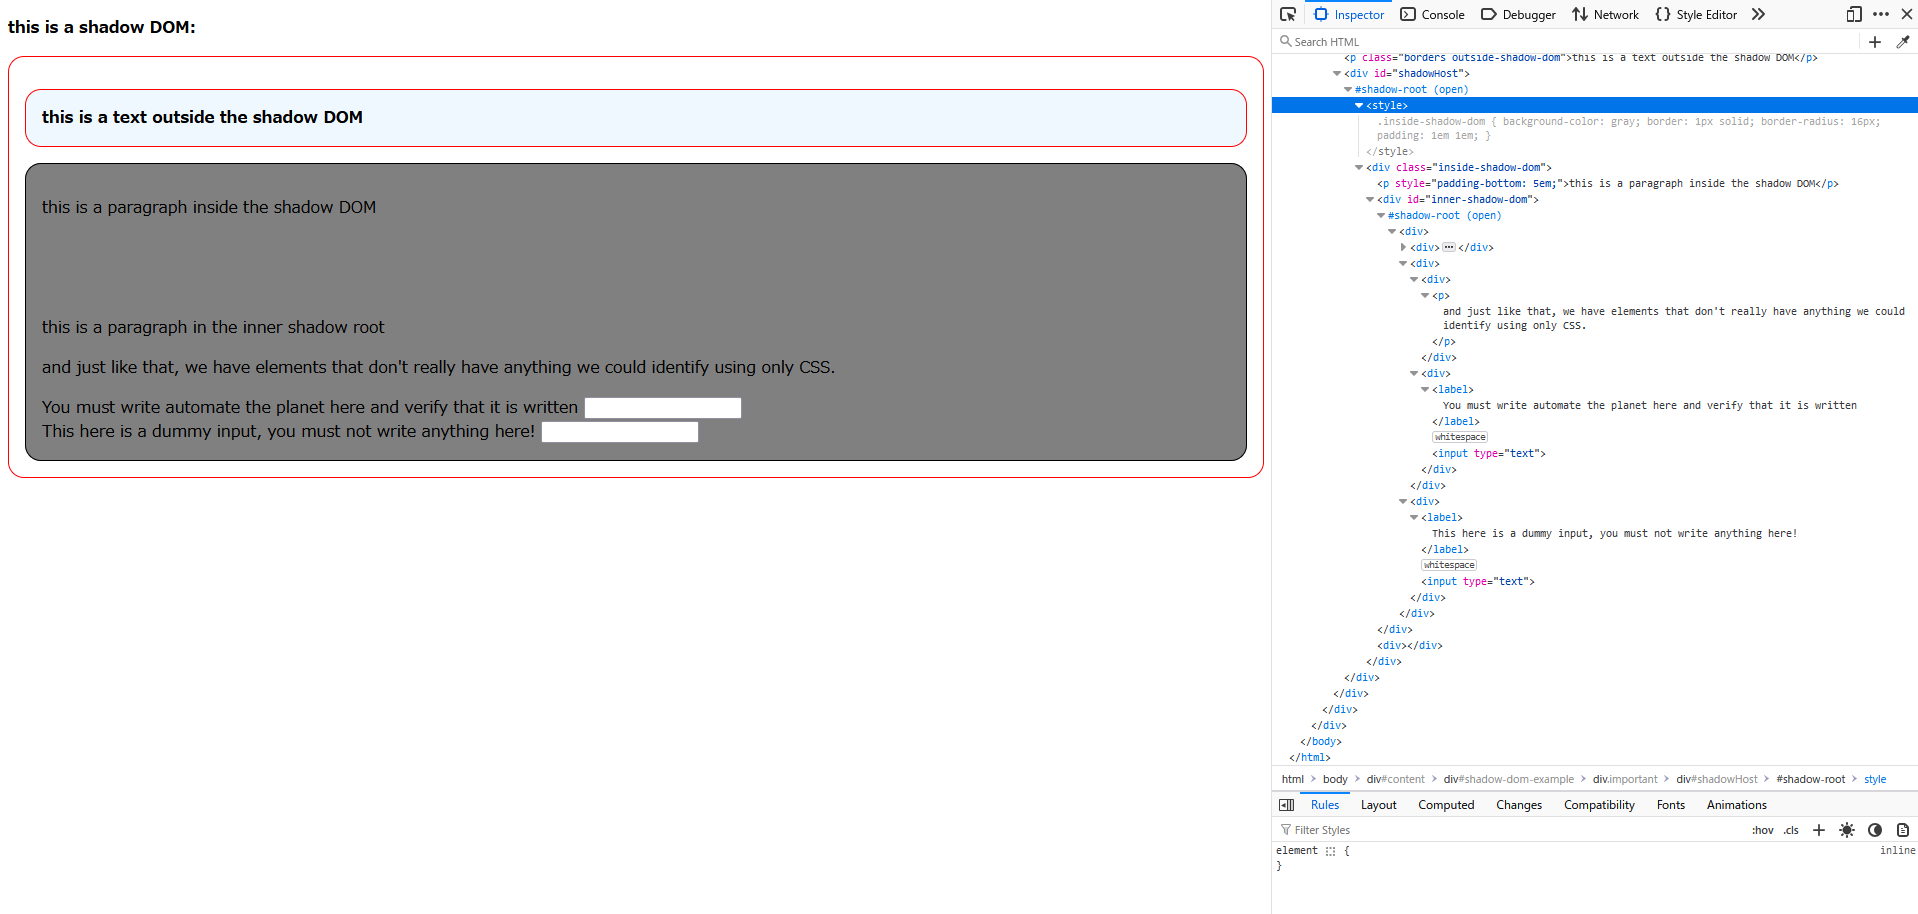
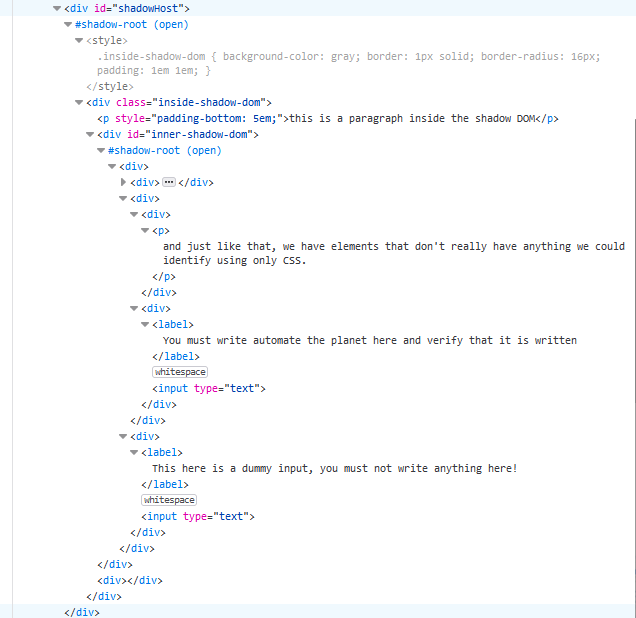
The Shadow DOM is a web standard that allows developers to encapsulate a part of the DOM (Document Object Model) inside an element, creating a “shadow tree.” This tree is isolated from the main document DOM, meaning styles and scripts inside the shadow DOM do not affect the rest of the page. It helps in building reusable and encapsulated web components by keeping them independent from the global scope of the page, preventing conflicts and providing better structure and styling isolation.
const shadowRoot = element.attachShadow({mode: 'open'});
shadowRoot.innerHTML = `<p>This is inside the shadow DOM!</p>`;
Constraints
Closed Mode
Shadow DOM has two modes – open and closed.
That is to say, open would allow JavaScript to pierce it which furthermore allows automation, and closed would not allow JavaScript to pierce it and thus, keeping it intact from outside influence, it results in automation being impossible.
When doing test automation as part of the QA process, a simple workaround for the issue that stems from shadow DOM closure is available – make the closed shadow DOM open in the testing environment, but keep it closed for the production environment. For this reason, this is not an issue we will discuss further in this article.
Need for Switching Context during Location
Due to the nature of shadow DOM, for locating an element inside it with Selenium, we must first find its shadow host inside the regular DOM tree and then get its shadow root.
@Test
public void fillInputFormInShadowDom() {
   WebDriver driver = new ChromeDriver();
   try {
       driver.get(URL);

       SearchContext shadowRoot = driver.findElement(By.cssSelector("#shadowHost")).getShadowRoot();
       SearchContext innerShadowRoot = shadowRoot.findElement(By.cssSelector("#inner-shadow-dom")).getShadowRoot();
       WebElement input = innerShadowRoot.findElement(By.cssSelector("div:nth-of-type(1) > div:nth-of-type(2) > div:nth-of-type(2) > input:nth-of-type(1)"));
       input.sendKeys("automate the planet");

       assertEquals("automate the planet", input.getAttribute("value"));
   } finally {
       driver.quit();
   }
}
This is a reasonable step until we have multiple nested shadow roots. Moreover, it is not even an edge case to have multiple nested shadow roots. For this reason, this issue shouldn’t be overlooked.
Only CSS
Inside the shadow DOM, the only way to locate elements is via CSS queries. This is sufficient in many cases, however, in some, XPath is the most optimal or even the only possible way to locate an element.
CSS has some limitations, compared to XPath, and to name the most crucial: it is impossible to know the text of an element; it is impossible to traverse the DOM (e.g., impossible to find the parent element, because CSS is designed for selecting elements that are descendants of other elements, not the other way around).
For instance, if the only way to find an element was through its text, locating it inside the shadow DOM would have been full of workarounds which are structure-dependent. Furthermore, because the final location strategy would be dependent on the current DOM tree structure, that would result in a higher risk of test failure and higher test maintenance cost as a result of UI changes, which occur more often than functional changes throughout the software development lifecycle.
Solution with JavaScript
There is a solution to the inability to use XPath inside the shadow DOM. Let’s take a look.
Theory
The theory behind the solution is as follows:
- We first find the uppermost shadow host (in case of nested shadow roots), then we copy its inner HTML.
- During the copying, we mark down the subsequent nested shadow roots if any are present (i.e., we substitute them with elements ).
- Then, inside the copy, we use whatever suits our needs – XPath or CSS – to find the element.
- After its location, we traverse backwards to the uppermost shadow host and mark down its absolute location in the form of XPath.
- Finally, we transform the absolute XPath to an absolute CSS and we apply it to the real shadow DOM.
In the case of existing shadow roots in the path to our element, we handle this in our framework easily with a function that will analyse the absolute CSS and automatically create WebElement/Locator objects and switch the context to them before continuing the search.
Now, the theory is a bit hard to understand at first glance so let’s take a look at the actual code and analyse each step of the process.
In Practice
Firstly, via Selenium or Playwright, when we are at the step of finding an element inside the shadow root, we run this script:
function (element, locator) {
    const child_combinator = " > ";
    const node = "/";

    function clone(element, tag) {
      let cloneElement;
      if (element instanceof ShadowRoot && !tag) {
        cloneElement = new DocumentFragment();
      } else if (tag) {
        cloneElement = document.createElement(tag);
      }
      else {
        cloneElement = element.cloneNode();
        if (element.firstChild && element.firstChild.nodeType === 3) {
          cloneElement.appendChild(element.firstChild.cloneNode());
        }
      }

      if (element.shadowRoot) {
        cloneElement.appendChild(clone(element.shadowRoot, "shadow-root"));
      }

      if (element.children) {
        for (const child of element.children) {
          cloneElement.appendChild(clone(child, undefined));
        }
      }

      return cloneElement;
    }

    function getAbsoluteXpath(element) {
      function indexElement(el) {
        let index = 1;

        let previousSibling = el.previousElementSibling;
        while (previousSibling) {
          if (previousSibling.nodeName.toLowerCase() === el.nodeName.toLowerCase()) {
            index++;
          }
          previousSibling = previousSibling.previousElementSibling;
        }

        if (el.tagName.toLowerCase() === "shadow-root") {
          return node + el.tagName.toLowerCase();
        } else {
          return node + el.tagName.toLowerCase() + "[" + index + "]";
        }
      }

      let xpath = [];

      let currentElement = element;
      while (currentElement) {
        if (currentElement.tagName.toLowerCase() === 'html' || currentElement.tagName.toLowerCase() === 'body' || currentElement.tagName.startsWith() === '#' || currentElement.tagName.toLowerCase() === "temporary-div") {
          break;
        }

        xpath.unshift(indexElement(currentElement));

        currentElement = currentElement.parentElement;
      }

      return xpath.join("");
    }

    function getAbsoluteCss(xpath) {
        let regex = new RegExp(node, 'g');
        let cssSelector = xpath.replace(regex, child_combinator);

        cssSelector = cssSelector.replace(/\[(\d+)\]/g, ':nth-of-type($1)');

        if (cssSelector.startsWith(child_combinator)) {
            cssSelector = cssSelector.substring(child_combinator.length);
        }

        return cssSelector;
    }

    const temporaryDiv = document.createElement("temporary-div");
    if (element.shadowRoot) {
          temporaryDiv.appendChild(clone(element.shadowRoot, undefined));
    } else {
      temporaryDiv.appendChild(clone(element, "shadow-root"));
    }


    if (locator.startsWith("/")) {
      return getAbsoluteCss(getAbsoluteXpath(document.evaluate(locator, temporaryDiv, null, XPathResult.FIRST_ORDERED_NODE_TYPE, null).singleNodeValue));
    } else {
      return getAbsoluteCss(getAbsoluteXpath(temporaryDiv.querySelector(locator)));
    }
  }
clone() function
function clone(element, tag) {
    let cloneElement;
    if (element instanceof ShadowRoot && !tag) {
        cloneElement = new DocumentFragment();
    } else if (tag) {
        cloneElement = document.createElement(tag);
    }
    else {
    cloneElement = element.cloneNode();
    if (element.firstChild && element.firstChild.nodeType === 3) {
            cloneElement.appendChild(element.firstChild.cloneNode());
        }
    }

    if (element.shadowRoot) {
        cloneElement.appendChild(clone(element.shadowRoot, "shadow-root"));
    }

    if (element.children) {
        for (const child of element.children) {
            cloneElement.appendChild(clone(child, undefined));
        }
    }

    return cloneElement;
}
The function receives an element. Depending on the type of the element (shadow root or normal element) it sets the initial value of the variable cloneElement.
if (element instanceof ShadowRoot && !tag) {
    cloneElement = new DocumentFragment();
}
If it’s a shadow root, it creates a new DocumentFragment (as there is nothing to clone), as this if-statement will only be true once – when passing the uppermost shadow root.
else if (tag) {
    cloneElement = document.createElement(tag);
}
Else, if it’s not shadow root and the tag is specified, it creates a new element with the specified tag. This statement is true only when we create a new element that will substitute for the shadow roots.
else {
    cloneElement = element.cloneNode();
    if (element.firstChild && element.firstChild.nodeType === 3) {
        cloneElement.appendChild(element.firstChild.cloneNode());
    }
}
Else, it directly clones the element. Once it clones it, it checks if it has children and if it does, if the first child is a text node, it copies it and appends it to the cloneElement.
if (element.shadowRoot) {
    cloneElement.appendChild(clone(element.shadowRoot, "shadow-root"));
}
Once we’ve cloned the element, we check if the element has a shadow root. If it does, we append to the cloneElement() a clone of the shadow root. Here, we use recursion and we call the same ‘clone()’ function again. Recursion is a programming technique where a function calls itself in order to solve a problem. Each recursive call works on a smaller portion of the problem, gradually approaching a base case - a condition that stops further recursion.
if (element.children) {
    for (const child of element.children) {
        cloneElement.appendChild(clone(child, undefined));
    }
}
And finally, if the element has children, for each child we append to the cloneElement a clone of the child, again using recursion. After that, we return the cloneElement.
getAbsoluteXpath() function
function getAbsoluteXpath(element) {
    function indexElement(el) {
        let index = 1;

        let previousSibling = el.previousElementSibling;
        while (previousSibling) {
            if (previousSibling.nodeName.toLowerCase() === el.nodeName.toLowerCase()) {
                index++;
            }
            previousSibling = previousSibling.previousElementSibling;
        }

        return node + el.tagName.toLowerCase() + "[" + index + "]";
    }

    let xpath = [];

    let currentElement = element;
    while (currentElement) {
    if (currentElement.tagName.toLowerCase() === 'html' || currentElement.tagName.toLowerCase() === 'body' || currentElement.tagName.startsWith() === '#' || currentElement.tagName.toLowerCase() === "temporary-div") {
        break;
    }

    xpath.unshift(indexElement(currentElement));

    currentElement = currentElement.parentElement;
    }

    return xpath.join("");
}
The first thing we see is a nested function called indexElement()
function indexElement(el) {
    let index = 1;

    let previousSibling = el.previousElementSibling;
    while (previousSibling) {
        if (previousSibling.nodeName.toLowerCase() === el.nodeName.toLowerCase()) {
            index++;
        }

        previousSibling = previousSibling.previousElementSibling;
    }

    if (el.tagName.toLowerCase() === "shadow-root") {
        return node + el.tagName.toLowerCase();
    } else {
        return node + el.tagName.toLowerCase() + "[" + index + "]";
    }
}
It checks if the passed el variable has previous siblings that are the same type, for example multiple <div> elements. If it does, it increases the index in a while-loop until all previous elements have been counted. Finally it returns a string in the form of **/tag[index]**. For example, **/div[3]**, which means that the element is the third <div>.
After that we continue with the core logic. We first define a variable ‘xpath’ which is an array.
let currentElement = element;
while (currentElement) {
    if (currentElement.tagName.toLowerCase() === 'html' || currentElement.tagName.toLowerCase() === 'body' || currentElement.tagName.startsWith() === '#' || currentElement.tagName.toLowerCase() === "temporary-div") {
        break;
    }

    xpath.unshift(indexElement(currentElement));

    currentElement = currentElement.parentElement;
}

return xpath.join("");
Then, in a while-loop we traverse back the DOM until the uppermost ancestor. We check if the element is “html”, or “body”, or starts with “#”, as all of them are invalid for our purposes and means that no further elements would be found beyond them, so we break the while-loop. Of course, we have a guard condition which checks if the variable currentElement is not null. If it’s null, it means we’ve reached the uppermost ancestor. The next logic is to insert at the beginning of the xpath array the result of the indexElement() function. Next, we set the currentElement to its parentElement and we loop back to the guard condition.
Finally, we add all elements of the array xpath into a string with no separator between them.
getAbsoluteCss() function
function getAbsoluteCss(xpath) {
    let regex = new RegExp(node, 'g');
    let cssSelector = xpath.replace(regex, child_combinator);

    cssSelector = cssSelector.replace(/\[(\d+)\]/g, ':nth-of-type($1)');

    if (cssSelector.startsWith(child_combinator)) {
        cssSelector = cssSelector.substring(child_combinator.length);
    }

    return cssSelector;
}
This function here is really simple. It converts an XPath expression into a CSS selector format.
let regex = new RegExp(node, 'g');This creates a regular expression using the node (i.e., ‘/’) pattern to match specific parts of the parts of the XPath string.
let cssSelector = xpath.replace(regex, child_combinator);After that, we replace every node with a child_combinator (i.e., ‘ > ’).
cssSelector = cssSelector.replace(/\[(\d+)\]/g, ':nth-of-type($1)');Next, we replace every instance of [index] with :nth-of-type(index).
if (cssSelector.startsWith(child_combinator)) {
    cssSelector = cssSelector.substring(child_combinator.length);
}

return cssSelector;
Finally, we ensure that our css selector doesn’t start with ‘ > ‘ which would make it invalid and then we return the newly created css selector.
Putting It All Together
const temporaryDiv = document.createElement("temporary-div");
if (element.shadowRoot) {
        temporaryDiv.appendChild(clone(element.shadowRoot, undefined));
} else {
    temporaryDiv.appendChild(clone(element, "shadow-root"));
}

if (locator.startsWith("/")) {
    return getAbsoluteCss(getAbsoluteXpath(document.evaluate(locator, temporaryDiv, null, XPathResult.FIRST_ORDERED_NODE_TYPE, null).singleNodeValue));
} else {
    return getAbsoluteCss(getAbsoluteXpath(temporaryDiv.querySelector(locator)));
}
Here is the final logic and how the described 3 methods are used.
const temporaryDiv = document.createElement("temporary-div");
if (element.shadowRoot) {
        temporaryDiv.appendChild(clone(element.shadowRoot, undefined));
} else {
    temporaryDiv.appendChild(clone(element, "shadow-root"));
}
We create a <div> that will host our clone and append the clone to it. If the passed element has shadow root, that means the element is the host; If it doesn’t have, that means it is the shadow root itself.
if (locator.startsWith("/")) {
    return getAbsoluteCss(getAbsoluteXpath(document.evaluate(locator, temporaryDiv, null, XPathResult.FIRST_ORDERED_NODE_TYPE, null).singleNodeValue));
}
Then, we determine if the locator passed is an XPath or not and then we return a transformed into CSS the absolute XPath of the found element.
else {
    return getAbsoluteCss(getAbsoluteXpath(temporaryDiv.querySelector(locator)));
}
If the locator being passed is CSS, we simply change how it is found and then we return a transformed into CSS the absolute XPath of the found element.
Why This Works
This method of finding elements in the shadow DOM is fast and reliable. We make a perfect copy of the shadow DOM and each and every time we recalculate the absolute position of any given element. Indeed, the final locator being returned is structure-dependent absolute CSS, nevertheless another two final but crucial steps will mitigate the risk of failing locators.
Automatic Element Creation
In the previous section we analysed the javascript code to be sent to the browser for execution.
This will be done like this in Selenium:
((JavascriptExecutor) driver).executeScript(String.format("return (%s)(arguments[0], arguments[1]);", jsFunction), shadowRoot, locator);Or like this in Playwright:
shadowHost.evaluate(String.format("el => (%s)(el, \"%s\");", jsFunction, locator));Now, the function is yet to overcome one major obstacle and that is the possibility of nested shadow roots. It only noted them down in the absolute CSS, but doesn’t change the fact that we would need to switch the context if it’s Selenium. Furthermore, shadow roots don’t exist in the form of elements and neither Selenium nor Playwright would understand the following instruction “ > shadow-root > ” from the absolute CSS we pass to them. That’s why we would need to create additional logic, this time in our code.
Here’s the solution for Selenium:
public static WebElement findElementInShadowDom(WebDriver driver, SearchContext shadowRoot, String css) {
    List<String> locators = new ArrayList<>(Arrays.asList(css.split(" > ")));

    // Remove the initial "shadow-root" if it exists
    if (!locators.isEmpty() && locators.get(0).equals("shadow-root")) {
        locators.remove(0);
    }

    // Base case: If no "shadow-root" exists in locators, return the located element
    if (!locators.contains("shadow-root")) {
        return shadowRoot.findElement(By.cssSelector(String.join(" > ", locators)));
    }

    // Recursive case: Traverse until "shadow-root" and locate next shadow root
    int shadowIndex = locators.indexOf("shadow-root");
    String localLocator = String.join(" > ", locators.subList(0, shadowIndex));
    SearchContext innerShadowRoot = shadowRoot.findElement(By.cssSelector(localLocator)).getShadowRoot();

    // Recurse with the remaining path after "shadow-root"
    return findElementInShadowDom(driver, innerShadowRoot, String.join(" > ", locators.subList(shadowIndex + 1, locators.size())));
}
And for Playwright:
public static Locator findElementInShadowDom(Locator shadowRoot, String css) {
   List<String> locators = new ArrayList<>(Arrays.asList(css.split(" > ")));

   // Remove the initial "shadow-root" if it exists
   if (!locators.isEmpty() && locators.get(0).equals("shadow-root")) {
       locators.remove(0);
   }

   // Base case: If no "shadow-root" exists in locators, return the located element
   if (!locators.contains("shadow-root")) {
       return shadowRoot.locator(String.join(" > ", locators));
   }

   // Recursive case: Traverse until "shadow-root" and locate next shadow root
   int shadowIndex = locators.indexOf("shadow-root");
   String localLocator = String.join(" > ", locators.subList(0, shadowIndex));
   Locator innerShadowRoot = shadowRoot.locator(localLocator);

   // Recurse with the remaining path after "shadow-root"
   return findElementInShadowDom(innerShadowRoot, String.join(" > ", locators.subList(shadowIndex + 1, locators.size())));
}
These methods would analyse the given string and every time it detects a shadow-root, it would automatically switch the context and delete the passed step of the absolute CSS. We are looking from the outermost element to the innermost element. You can easily implement a similar function in your code.
Always Re-find Elements
As we’ve discussed previously, the generated absolute CSS couldn’t be anything other than structure-dependent. That doesn’t do well against DOM that changes. That’s the reason why every time we do something with an element, it is important to re-find it again. We’ve encountered a similar situation with Selenium’s StaleElementReferenceException and the way to minimise the risk of encountering such an exception is exactly the same – always re-find elements before use.
The most simple way to do this is to introduce Page Object Model to our testing suit. You can learn more for POM here. Basically, we have methods that contain our logic for finding elements and they return WebElement/Locator, based on the tool being used.
In Selenium:
public static WebElement inputForm() {
   String locator = "//input[./preceding-sibling::label[contains(text(), 'automate the planet')]]";

   SearchContext shadowRoot = driver.findElement(By.cssSelector("#shadowHost")).getShadowRoot();

   String absoluteCss = (String) ((JavascriptExecutor) driver).executeScript(String.format("return (%s)(arguments[0], arguments[1]);", jsFunction), shadowRoot, locator);

   return findElementInShadowDom(driver, shadowRoot, absoluteCss);
}
In Playwright:
public Locator inputForm() {
    String locator = "//input[./preceding-sibling::label[contains(text(), 'automate the planet')]]";

    Locator shadowHost = shadowHost();
    String absoluteCss = (String)shadowHost.evaluate(String.format("el => (%s)(el, \"%s\");", jsFunction, locator));

    return findElementInShadowDom(shadowHost, absoluteCss);
}
Example
In the code examples below, we will try to find the input element which has a label “You must write automate the planet here and verify that it is written”.
Selenium
@Test
public void fillInputFormInShadowDom() {
   WebDriver driver = new ChromeDriver();
   try {
       driver.get(ShadowDomPage.getUrl());
       ShadowDomPage.inputForm().sendKeys("automate the planet");

       assertEquals("automate the planet", ShadowDomPage.inputForm().getAttribute("value"));
   } finally {
       driver.quit();
   }
}
Playwright
@Test
public void fillInputFormInShadowDom() {
   try (Playwright playwright = Playwright.create()) {
       Browser browser = playwright.chromium().launch(new BrowserType.LaunchOptions().setHeadless(false));
       Page page = browser.newPage();

        page.navigate(ShadowDomPage.getUrl());

        ShadowDomPage.inputForm().fill("automate the planet");
        assertThat(ShadowDomPage.inputForm()).hasValue("automate the planet");
   }
}
Summary
In this post, we explored the challenges of automating Shadow DOM, a web standard designed for encapsulating DOM elements. We discussed how open and closed shadow roots affected tools like Selenium and Playwright, highlighting limitations of CSS selectors, such as locating elements by text or handling nested shadow roots. To address these challenges, we introduced a JavaScript solution combining XPath and CSS selectors, enabling accurate targeting of elements. For more information, check BELLATRIX framework and how the shadow DOM logic is implemented there.