
In the last article from the WebDriver Series, I showed you how you could use HTML2Canvas.js to create full page screenshots in WebDriver tests. Here we will go even further using the same code, but instead of injecting it every time, we will use a browser extension for the job. We will go in details how to create browser extension for tests’ purposes.
Code for Taking Full Page Screenshots without Browser Extension
public void TakingHTML2CanvasFullPageScreenshot()
{
    using (var driver = new ChromeDriver())
    {
        driver.Manage().Timeouts().PageLoad = TimeSpan.FromSeconds(5);
        driver.Navigate().GoToUrl(@"https://automatetheplanet.com");
        IJavaScriptExecutor js = driver;
        var html2canvasJs = File.ReadAllText($"{GetAssemblyDirectory()}html2canvas.js");
        js.ExecuteScript(html2canvasJs);
        string generateScreenshotJS =
        @"function genScreenshot () {
var canvasImgContentDecoded;
html2canvas(document.body).then(function(canvas) {
window.canvasImgContentDecoded = canvas.toDataURL(""image/png"");
});
}
genScreenshot();";
        js.ExecuteScript(generateScreenshotJS);
        var wait = new WebDriverWait(driver, TimeSpan.FromSeconds(10));
        wait.IgnoreExceptionTypes(typeof(InvalidOperationException));
        wait.Until(
        wd =>
        {
            string response = (string)js.ExecuteScript
    ("return (typeof canvasImgContentDecoded === 'undefined' || canvasImgContentDecoded === null)");
            if (string.IsNullOrEmpty(response))
            {
                return false;
            }
            return bool.Parse(response);
        });
        wait.Until(wd => !string.IsNullOrEmpty((string)js.ExecuteScript("return canvasImgContentDecoded;")));
        var pngContent = (string)js.ExecuteScript("return canvasImgContentDecoded;");
        pngContent = pngContent.Replace("data:image/png;base64,", string.Empty);
        var tempFilePath = Path.GetTempFileName().Replace(".tmp", ".png");
        File.WriteAllBytes(tempFilePath, Convert.FromBase64String(pngContent));
    }
}
private string GetAssemblyDirectory()
{
    string codeBase = Assembly.GetExecutingAssembly().Location;
    var uri = new UriBuilder(codeBase);
    string path = Uri.UnescapeDataString(uri.Path);
    return Path.GetDirectoryName(path);
}
The above code is working. However, the problem here is that we need to execute a significant amount of Java Script code every time we need a screenshot. Some of the JS code is copied as a string in the C# code which I don’t think is the best practice for maintainable tests.
While ago when we were working on the first version of the BELLATRIX test automation framework, I did this research while I was working on a similar feature for our solution.
Code for Taking Full Page Screenshots with Browser Extension
A better way of achieving the same thing is to move the Java Script code to a browser extension. When the page is loaded, the screenshot is created. We can, of course, optimize the solution instead of capturing the page every time to expose that as JS function that we can call inside our test.
public void TakingHTML2CanvasFullPageScreenshot()
{
    var options = new ChromeOptions();
    options.AddArguments($"load-extension={GetAssemblyDirectory()}FullPageScreenshotsExtension-Chrome");
    var capabilities = new DesiredCapabilities();
    capabilities.SetCapability(ChromeOptions.Capability, options);
    var dc = DesiredCapabilities.Chrome();
    dc.SetCapability(ChromeOptions.Capability, options);
    using (var driver = new ChromeDriver(options))
    {
        driver.Manage().Timeouts().PageLoad = TimeSpan.FromSeconds(5);
        driver.Navigate().GoToUrl(@"https://automatetheplanet.com");
        var wait = new WebDriverWait(driver, TimeSpan.FromSeconds(10));
        var fullPageImg = wait.Until(ExpectedConditions.ElementExists(By.Id("fullPageScreenshotId")));
        var pngContent = fullPageImg.GetAttribute("src");
        pngContent = pngContent.Replace("data:image/png;base64,", string.Empty);
        byte[] data = Convert.FromBase64String(pngContent);
        var tempFilePath = Path.GetTempFileName().Replace(".tmp", ".png");
        Image image;
        using (var ms = new MemoryStream(data))
        {
            image = Image.FromStream(ms);
        }
        image.Save(tempFilePath, ImageFormat.Png);
    }
}
private string GetAssemblyDirectory()
{
    string codeBase = Assembly.GetExecutingAssembly().CodeBase;
    var uri = new UriBuilder(codeBase);
    string path = Uri.UnescapeDataString(uri.Path);
    return Path.GetDirectoryName(path);
}
We first load the unpacked extension from the output folder of our tests.
var options = new ChromeOptions();
options.AddArguments($"load-extension={GetAssemblyDirectory()}FullPageScreenshotsExtension-Chrome");
var capabilities = new DesiredCapabilities();
capabilities.SetCapability(ChromeOptions.Capability, options);
var dc = DesiredCapabilities.Chrome();
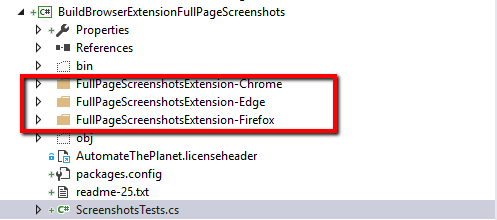
dc.SetCapability(ChromeOptions.Capability, options);Below you can find the folder structure of the project. We have three separate folders for the different browser extensions. We need to make sure that they are copied to the output folder. To do so we use project’s build events.
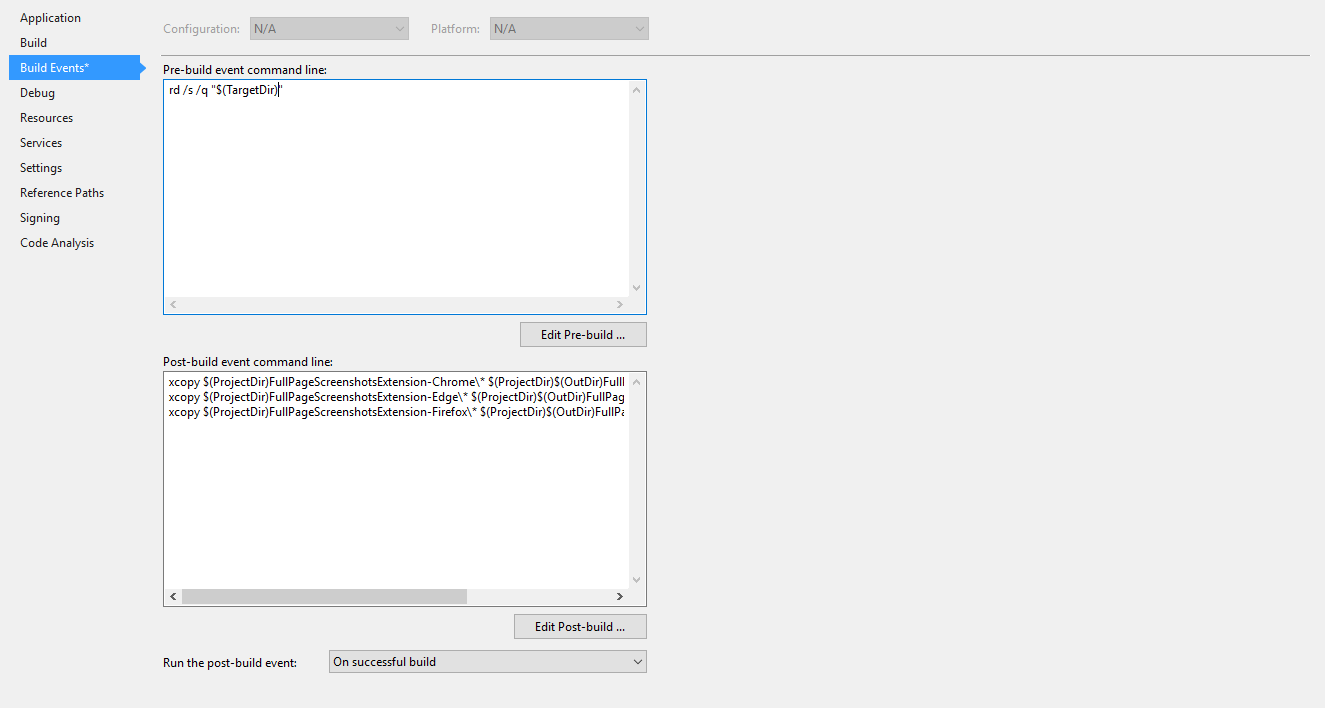
Pre-build event command line:
rd /s /q "$(TargetDir)"Used to delete all previously copied browser extensions’ related folders since they are not deleted from the MSBuild Clean target.
Post-build event command line:
xcopy $(ProjectDir)FullPageScreenshotsExtension-Chrome* $(ProjectDir)$(OutDir)FullPageScreenshotsExtension-Chrome /Y /I /Excopy $(ProjectDir)FullPageScreenshotsExtension-Edge* $(ProjectDir)$(OutDir)FullPageScreenshotsExtension-Edge /Y /I /Excopy $(ProjectDir)FullPageScreenshotsExtension-Firefox* $(ProjectDir)$(OutDir)FullPageScreenshotsExtension-Firefox /Y /I /EWe use the above commands to copy the three folders to the output folder.
var wait = new WebDriverWait(driver, TimeSpan.FromSeconds(10));
var fullPageImg = wait.Until(ExpectedConditions.ElementExists(By.Id("fullPageScreenshotId")));
var pngContent = fullPageImg.GetAttribute("src");
The extension creates a hidden image element which source is our full page screenshot. So, we locate it and then get the content from the src attribute. The rest of the code is similar to the solution without browser extensions.
Build Test Browser Extensions
Chrome Extension
The very first thing we’ll need to create is a manifest file named manifest.json. This manifest is nothing more than a metadata file in JSON format that contains properties like your extension’s name, description, version number and so on. At a high level, we will use it to declare to Chrome what the extension is going to do, and what permissions it requires in order to do those things.
{
  "name": "WebDriver Full Page Screenshots",
  "version": "0.0.2",
  "manifest_version": 2,
  "description": "Used to create full page screenshots in Selenium WebDriver tests.",
  "background": {
    "scripts": ["background.js"],
    "persistent": true
  },
  "content_scripts": [
    {
      "matches": ["<all_urls>"],
      "js": ["contentScript.js"]
    }
  ],
  "browser_action": {
    "default_title": "WebDriver Full Page Screenshots"
  },
  "permissions": ["https://*/*", "http://*/*", "tabs", "<all_urls>"]
}
Chrome extensions have two distinct parts involving Javascript: the background scripts (runs in the background) and the content scripts (runs on a certain page and can access the DOM). Content scripts cannot access most of the Chrome extension API, but background and content scripts can communicate indirectly through message passing.
This is the code that is executed on load on every page. We send a message to our background.js to take a screenshot.
chrome.runtime.sendMessage({ greeting: "screenshot" });We add a listener in the background script of the extension. When a screenshot is requested, it will execute in the current tab the html2canvas.js code.
chrome.runtime.onMessage.addListener(function(request, sender, sendResponse) {
    if (request.greeting == "screenshot")
    {
        chrome.tabs.query(
        { currentWindow: true, active: true },
      function(tabArray) {
            chrome.tabs.executeScript(tabArray[0].id, { file: "html2canvas.js" });
        }
    );
    }
});
The html2canvas.js file contains the whole code of HTML2Canvas.js library and the below function which makes the screenshot. Then creates a hidden image element and assigns the content of the screenshot. As previously stated we locate this image in the WebDriver code and take its source.
// ...
// all of the rest HTML2Canvas.js
(function() {
    html2canvas(document.body, {
    onrendered: function(canvas) {
            var img = document.createElement("img");
            img.src = canvas.toDataURL("image/png");
            img.style.visibility = "hidden";
            img.id = "fullPageScreenshotId";
            document.body.appendChild(img);
        },
  });
})();
Edge Extension
The same extension’s code base can be used to create an extension for Edge.
Firefox Extension
The code for Firefox is almost identical to the one for Chrome. The only difference is that you need to change the chrome namespace in the API with browser. Also, during the testing process, I found a problem of the execution in Firefox through extensions. I still don’t have a working version. As soon as I have a working version, I will update the article. Moreover, you are more than welcome to comment if you know how to make it work.