
The second article from the Appium Series is going to be about testing iOS apps. I am going to show you how to configure your machine to test iOS applications – prerequisite installations and setup of simulators. After that, you will find how to start your application on the simulator and perform actions on it.
What Is Appium?
Appium is an open source test automation framework for use with native, hybrid and mobile web apps. It drives iOS, Android, and Windows apps using the WebDriver protocol. It is the “standard” for mobile test automation.
Machine Setup
1. Install Java Development Kit (JDK) version 7 or above
2. Install Node Js
3. Install Appium from the terminal (skip if you install Appium Desktop)
npm install -g appium4. Install Appium Desktop (optional)
5. Install Xcode from the Mac App Store
Start iOS App in Simulator
You need to make sure that the Appium server is started and listening on port 4723.
class AppiumTests {
    private lateinit var driver: IOSDriver<IOSElement>

    @BeforeClass
    fun classInit() {
        val testAppUrl = javaClass.classLoader.getResource("TestApp.app.zip")
        val testAppFile = Paths.get(Objects.requireNonNull(testAppUrl).toURI()).toFile()
        val testAppPath = testAppFile.absolutePath
        val desiredCaps = DesiredCapabilities()
        desiredCaps.setCapability(MobileCapabilityType.DEVICE_NAME, "iPhone 8")
        desiredCaps.setCapability(MobileCapabilityType.PLATFORM_NAME, "iOS")
        desiredCaps.setCapability(MobileCapabilityType.PLATFORM_VERSION, "14.4")
        desiredCaps.setCapability(MobileCapabilityType.APP, testAppPath)
        driver = IOSDriver(URL("http://127.0.0.1:4723/wd/hub"), desiredCaps)
        driver.closeApp()
    }

    @BeforeMethod
    fun testInit() {
        driver.launchApp()
    }

    @AfterMethod
    fun testCleanup() {
        driver.closeApp()
    }
}
After the driver is initialised we closed if the app is open. Then before each test, we launch the app.
Start Appium Service with Code
Instead of starting Appium server manually, we can start it from code.
appiumLocalService = AppiumServiceBuilder().usingAnyFreePort().build()
appiumLocalService.start()
Get Path to Test App
The apk file is copied from the Resources folder to the compiled binaries. This is how we get the path.
val testAppUrl = javaClass.classLoader.getResource("TestApp.app.zip")
val testAppFile = Paths.get(Objects.requireNonNull(testAppUrl).toURI()).toFile()
val testAppPath = testAppFile.absolutePath
Initialize Appium Options
val testAppUrl = javaClass.classLoader.getResource("TestApp.app.zip")
val testAppFile = Paths.get(Objects.requireNonNull(testAppUrl).toURI()).toFile()
val testAppPath = testAppFile.absolutePath
val desiredCaps = DesiredCapabilities()
desiredCaps.setCapability(MobileCapabilityType.DEVICE_NAME, "iPhone 8")
desiredCaps.setCapability(MobileCapabilityType.PLATFORM_NAME, "iOS")
desiredCaps.setCapability(MobileCapabilityType.PLATFORM_VERSION, "14.4")
desiredCaps.setCapability(MobileCapabilityType.APP, testAppPath)
driver = IOSDriver(URL("http://127.0.0.1:4723/wd/hub"), desiredCaps)
Find iOS Locators with Appium Desktop
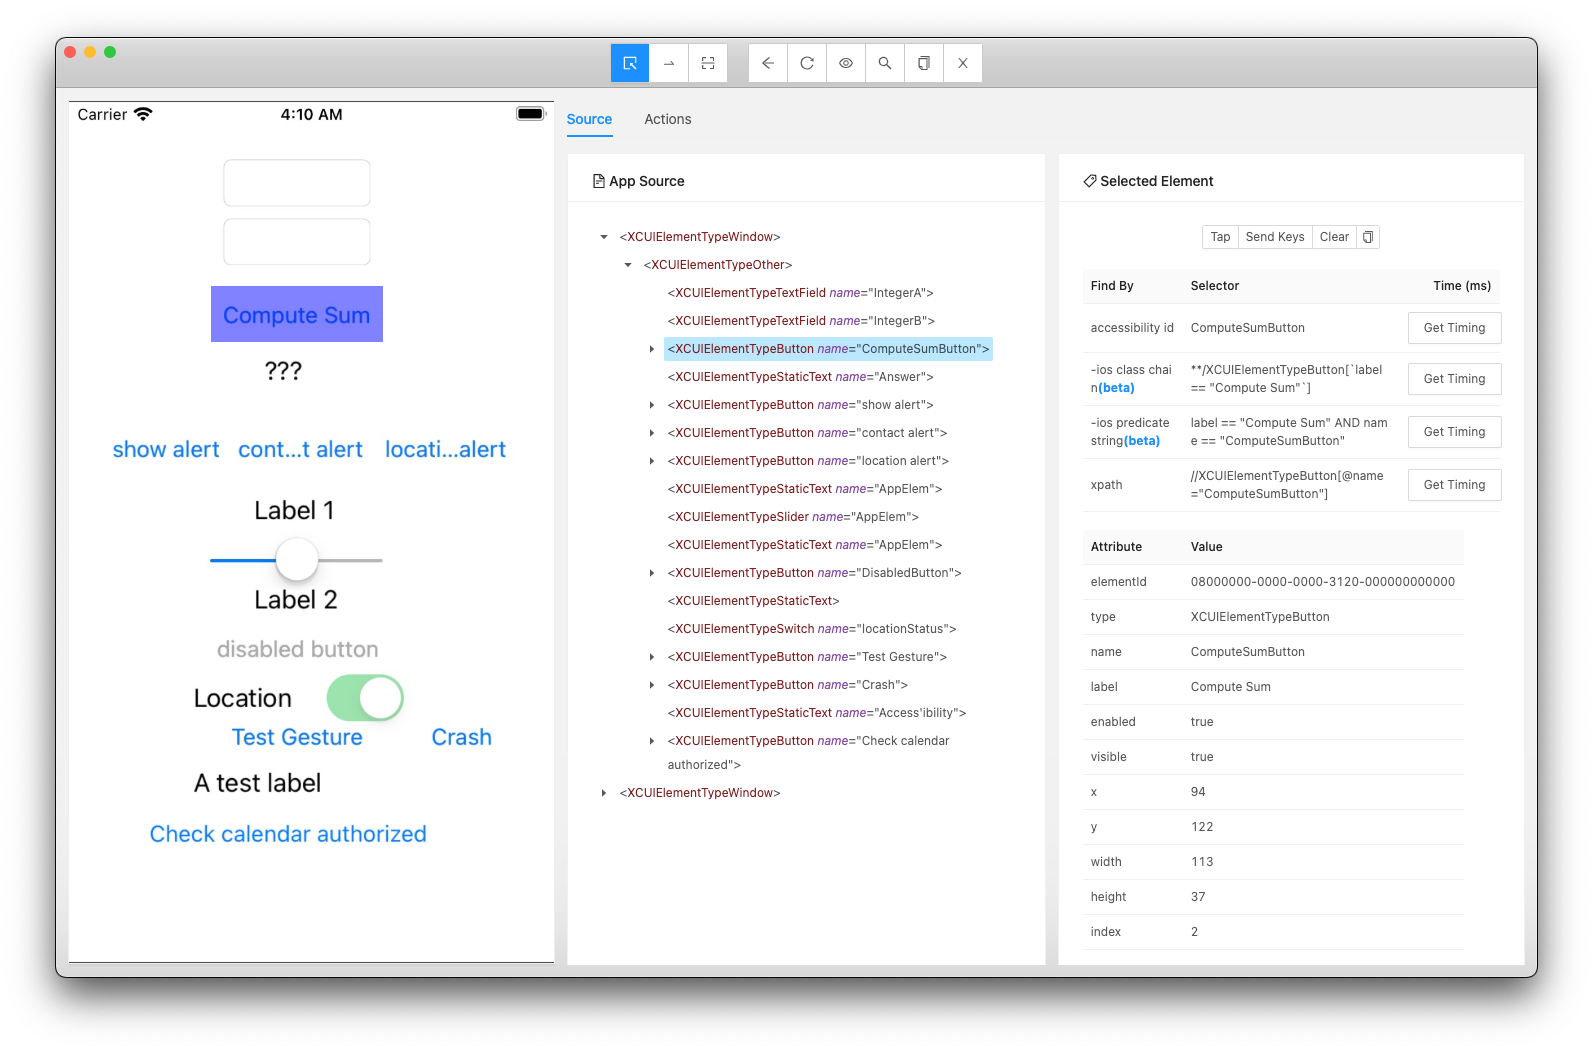
Appium provides you with a neat tool that allows you to find the elements you’re looking for. With Appium Desktop you can find any item and its locators by either clicking the element on the screenshot image or locating it in the source tree.
After launching Appium Desktop and starting a session, you can locate any element in the source.
Locating Elements with Appium
-
By ID
    val textField = driver.findElementById("IntegerA")
    ```

-   #### By Class

```kotlin
    val textField = driver.findElementByClassName("XCUIElementTypeTextField")
    ```

-   #### By Name

```kotlin
    val textField = driver.findElementByName("IntegerA")
    ```

-   #### By XPath

```kotlin
    val button = driver.findElementByXPath("//XCUIElementTypeButton[@name='ComputeSumButton']")
    ```

-   #### By IosNsPredicate

```kotlin
    val button = driver.findElementByIosNsPredicate("type == \"XCUIElementTypeButton\" AND name == \"ComputeSumButton\"")
    ```


### Locate Elements using IOSDriver

```kotlin
@Test
fun addTwoNumbersTest() {
    val numberOne = driver.findElementByName("IntegerA")
    val numberTwo = driver.findElementByName("IntegerB")
    val compute = driver.findElementByName("ComputeSumButton")
    val answer = driver.findElementByName("Answer")
    numberOne.clear()
    numberOne.setValue("5")
    numberTwo.clear()
    numberTwo.setValue("6")
    compute.click()
    Assert.assertEquals("11", answer.getAttribute("value"))
}
You just need to call the f****indElementBy methods of the IOSDriver to locate the elements.
Locate Elements inside Parent
@Test
fun locatingElementsInsideAnotherElementTest() {
    val mainElement =
        driver.findElementByIosNsPredicate(
            "type == \"XCUIElementTypeApplication\" AND name == \"TestApp\""
        )
    val numberOne = mainElement.findElementById("IntegerA")
    val numberTwo = mainElement.findElementById("IntegerB")
    val compute = mainElement.findElementByName("ComputeSumButton")
    val answer = mainElement.findElementByName("Answer")
    numberOne.clear()
    numberOne.setValue("5")
    numberTwo.clear()
    numberTwo.setValue("6")
    compute.click()
    Assert.assertEquals("11", answer.getAttribute("value"))
}
You have similar f****indElementBy methods on element level so that you can find elements inside other elements.
Gesture Actions in Appium
To perform any touch actions, we use the special TouchAction class. You can use it to do a series of steps simultaneously.
Swipe
@Test
fun swipeTest() {
    class PlatformTouchAction(performsTouchActions: PerformsTouchActions) :
        TouchAction<PlatformTouchAction>(performsTouchActions)
    val touchAction = PlatformTouchAction(driver)
    val element = driver.findElementById("IntegerA")
    val point = element.location
    val size = element.size
    touchAction
        .press(PointOption.point(point.x + 5, point.y + 5))
        .waitAction(WaitOptions.waitOptions(Duration.ofMillis(200)))
        .moveTo(PointOption.point(point.x + size.width - 5, point.y + size.height - 5))
        .release()
        .perform()
}
MoveTo
@Test
fun moveToTest() {
    class PlatformTouchAction(performsTouchActions: PerformsTouchActions) :
        TouchAction<PlatformTouchAction>(performsTouchActions)
    val touchAction = PlatformTouchAction(driver)
    val element = driver.findElementById("IntegerA")
    val point = element.location
    touchAction.moveTo(PointOption.point(point)).perform()
}
Tap
@Test
fun tapTest() {
    class PlatformTouchAction(performsTouchActions: PerformsTouchActions) :
        TouchAction<PlatformTouchAction>(performsTouchActions)
    val touchAction = PlatformTouchAction(driver)
    val element = driver.findElementById("IntegerA")
    val point = element.location
    touchAction
        .tap(TapOptions.tapOptions().withPosition(PointOption.point(point)).withTapsCount(2))
        .perform()
}