

In the last article from the Appium Series, we looked into a long list of useful ADB commands that you can use to control Android devices through CMD. In this publication, we will continue the subject by looking at how you can add additional functionality to Appium Driver if something is not implemented natively.
While ago when we were working on the first version of the BELLATRIX test automation framework, I did this research while I was working on a similar features for our solution.
What Is ADB?
ADB, Android Debug Bridge, is a command-line utility included with Google’s Android SDK. ADB can control your device over USB from a computer, copy files back and forth, install and uninstall apps, run shell commands, and more.
You can check the Getting Started with Appium for Android C# on Windows in 10 Minutes article for more details about Appium. Also, you can read and download the ADB cheatsheet. Here, we will call some of these ADB commands through Appium C#.
How to Execute ADB Shell Commands via Appium?
I read about this possibility for the first time in the AppiumPro article, which was written in Java and decided to play and try it in C#.
Note
Keep in mind that I found that this functionality is not very stable lately and sometimes is not working at all in the latest version of the C# bindings. I hope that the Appium maintainers will stabilize it soon.
First, you need to start Appium in relax security mode. Since Appium 1.7.2 there is a flag called —relaxed-security which you can call while starting Appium server.
Start Appium Desktop in Relaxed Security
First, you need to start Appium Desktop as Administrator. Next, click on the Advanced tab and check Relaxed Security.
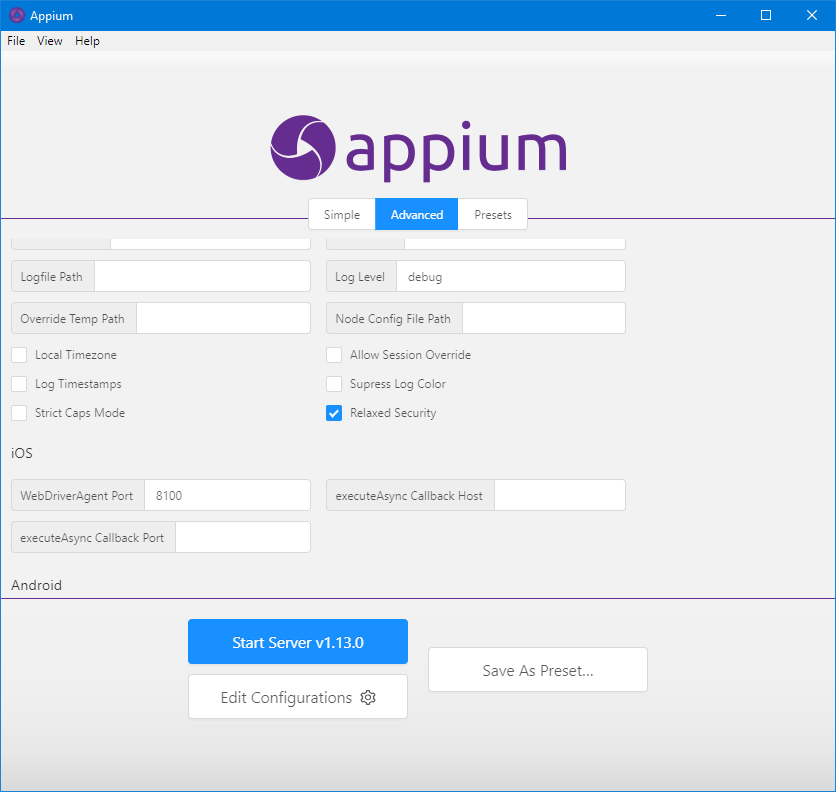
Start Appium Server in Relaxed Security CLI
- Download and install the Node and NPM tool.
2. Install Appium through Command line
npm install -g appium3. Start Appium Server
appium --relaxed-securityStart Appium Server in Relaxed Security C# Code
You can start the Appium Server directly from your C# code. You can use the below snippet.
public class AppiumTests
{
    private static AndroidDriver<AndroidElement> _driver;
    private static AppiumLocalService _appiumLocalService;

    public static void ClassInitialize(TestContext context)
    {
        var args = new OptionCollector()
        .AddArguments(GeneralOptionList.PreLaunch())
        .AddArguments(new KeyValuePair<string, string>("--relaxed-security", string.Empty));
        _appiumLocalService = new AppiumServiceBuilder().WithArguments(args).UsingAnyFreePort().Build();
        _appiumLocalService.Start();
        string testAppPath = Path.Combine(AppDomain.CurrentDomain.BaseDirectory, "Resources", "ApiDemos-debug.apk");
        var appiumOptions = new AppiumOptions();
        appiumOptions.AddAdditionalCapability(MobileCapabilityType.AutomationName, "UiAutomator2");
        appiumOptions.AddAdditionalCapability(MobileCapabilityType.DeviceName, "android25-test");
        appiumOptions.AddAdditionalCapability(AndroidMobileCapabilityType.AppPackage, "com.example.android.apis");
        appiumOptions.AddAdditionalCapability(MobileCapabilityType.PlatformName, "Android");
        appiumOptions.AddAdditionalCapability(MobileCapabilityType.PlatformVersion, "7.1");
        appiumOptions.AddAdditionalCapability(AndroidMobileCapabilityType.AppActivity, ".ApiDemos");
        appiumOptions.AddAdditionalCapability(MobileCapabilityType.App, testAppPath);
        _driver = new AndroidDriver<AndroidElement>(_appiumLocalService, appiumOptions);
        _driver.CloseApp();
    }

    public void TestInitialize()
    {
        _driver?.LaunchApp();
        _driver?.StartActivity("com.example.android.apis", ".ApiDemos");
    }

    public void TestCleanup()
    {
        _driver?.CloseApp();
    }

    public static void ClassCleanup()
    {
        _appiumLocalService.Dispose();
    }
    // tests...
}
The most important part is where we supply the KeyValuePair for the relaxed security flag.
var args = new OptionCollector()
.AddArguments(GeneralOptionList.PreLaunch())
.AddArguments(new KeyValuePair<string, string>("--relaxed-security", string.Empty));
_appiumLocalService = new AppiumServiceBuilder().WithArguments(args).UsingAnyFreePort().Build();
_appiumLocalService.Start();
Use ExecuteScript to Run Shell ADB Commands
Appium maintainers created a ‘backdoor’ for us for running ADB shell commands through the ExecuteScript method. We need to run it with a first argument equal to “mobile: shell” and the second one in JSON format which contains the information about the actual shell ADB command.
If we want to execute the following command: adb shell dumpsys battery reset (which resets the state of the battery), we need to provide a JSON in the following format: {“command”: “dumpsys”, “args”: [“battery”, “reset”]}. So, we need to provide the actual command, and the rest of the parameters are passed as the JSON array args.
public void PerformRandomShellCommandAsJson()
{
    string result = _driver.ExecuteScript("mobile: shell", "{"command": "dumpsys", "args": ["battery", "reset"]}").ToString();
    Debug.WriteLine(result);
}
Develop ADB Android Appium Driver Library
Using pure JSON in C# is pretty unreadable. We are smart and can use the .NET serialization libraries to make our code prettier. For the job, first, we create a new class called AdbCommand.
public class AdbCommand
{
    public AdbCommand(string command)
    {
        Command = command;
        Args = new List<string>();
    }
    public AdbCommand(string command, params string[] args)
    {
        Command = command;
        Args = new List<string>(args);
    }
    [JsonProperty("command")]
    public string Command { get; set; }
    [JsonProperty("args")]
    public List<string> Args { get; set; }
    public override string ToString()
    {
        return JsonConvert.SerializeObject(this);
    }
}
Also, I installed an additional C# library called Newtonsoft.Json, which simplifies the JSON serialization and deserialization. We use the JsonProperty attributes to tell the library how to name these properties in the result JSON. Also, we override the ToString method, and there we return the whole object as JSON through Newtonsoft.Json SerializeObject method.
Here is how looks the same code through the usage of the new class.
public void PerformRandomShellCommand()
{
    string result = _driver.ExecuteScript("mobile: shell", new AdbCommand("dumpsys", "battery", "reset").ToString()).ToString();
    Debug.WriteLine(result);
}
Create Appium Driver ADB Extension Methods
To reuse some code and make the usage of the new methods much easier we can create extension methods to the AndroidDriver.
public static class AppiumDriverAbdExtensionMethods
{
    public static string GetLogs(this AndroidDriver<AndroidElement> androidDriver)
    {
        return ExecuteShellAdbCommand(androidDriver, "logcat"); ;
    }
    public static void ChangeBatteryLevel(this AndroidDriver<AndroidElement> androidDriver, int level)
    {
        ExecuteShellAdbCommand(androidDriver, $"dumpsys battery set level {level}");
    }
    public static void ChangeBatteryReset(this AndroidDriver<AndroidElement> androidDriver)
    {
        ExecuteShellAdbCommand(androidDriver, "adb shell dumpsys battery reset");
    }
    public static string GetBatteryStatus(this AndroidDriver<AndroidElement> androidDriver)
    {
        return ExecuteShellAdbCommand(androidDriver, "adb shell dumpsys battery"); ;
    }
    private static string ExecuteShellAdbCommand(AndroidDriver<AndroidElement> androidDriver, string command, params string[] args)
    {
        return androidDriver.ExecuteScript("mobile: shell", new AdbCommand(command, args).ToString()).ToString();
    }
}
Here is how we use the new API.
public void PerformShellCommandViaExtensionMethod()
{
    _driver.ResetBattery();
}