
The third article from the Appium Series is going to be about testing Android apps on Mac machine. I am going to show you how to configure your Mac machine to test Android applications- prerequisite installations and setup of emulators. After that, you will find how to start your application on the emulator and perform actions on it.
What Is Appium?
Appium is an open source test automation framework for use with native, hybrid and mobile web apps. It drives iOS, Android, and Windows apps using the WebDriver protocol. It is the “standard” for mobile test automation.
Machine Setup
1. Install Java 7 JDK
2. Set JAVA_HOME environmental variable to where Java JDK is installed
Put this in your login script:
export JAVA_HOME=“/Library/Java/JavaVirtualMachines/jdk1.8.0_111.jdk/Contents/Home”
3. Install the Android SDK
4. Set the ANDROID_HOME environment variable to match this path
Note
For example, if you installed the SDK to /usr/local/adt, then there will typically be a sdk folder inside of that which contains the SDK files.
Add the following line to your login script
export ANDROID_HOME=“/usr/local/adt/sdk”
5. Install Node.js
6. Install Appium from the command line (skip if you install Appium Desktop)
npm install -g appium7. Install Appium Desktop (optional)
8. Install Visual Studio for Mac with all Xamarin components. The installer will automatically include any tools and SDKs needed for Android development. This may take a while depending on what is already installed on the computer since it may have to download fairly large SDKs. Read the detailed step by step installation instructions.
Note: Make sure you have at least 40GB of free disk space. The IDE, simulator and emulator images and associated SDKs are all quite large.
9. Install the latest version of XCode from the Mac App Store
10. Create a virtual device with the Android Device Manager
Install APK to Virtual Device
ADB, Android Debug Bridge, is a command-line utility included with Google’s Android SDK. ADB can control your device over USB from a computer, copy files back and forth, install and uninstall apps, run shell commands, and more.
If you put the android-sdks folder in other directory, replace the path with the directory android-sdks/platform-tools is in.
echo "export PATH=\$PATH:/Users/${USER}/Library/Android/sdk/platform-tools/" >> ~/.bash_profile && source ~/.bash_profileFirst, start the ADB shell using the command-
adb shellBefore automating your app, you may need to expect it and find some info about it. So, you need to install it on your virtual device. To do so, open the command line and execute the following command.
adb install pathToYourApk/yourTestApp.apkTo find the app package and current activity. Open your application on the virtual device and navigate to the desired view. Then open adb shell and use the following command.
dumpsys window windows | grep -E 'mCurrentFocus|mFocusedApp'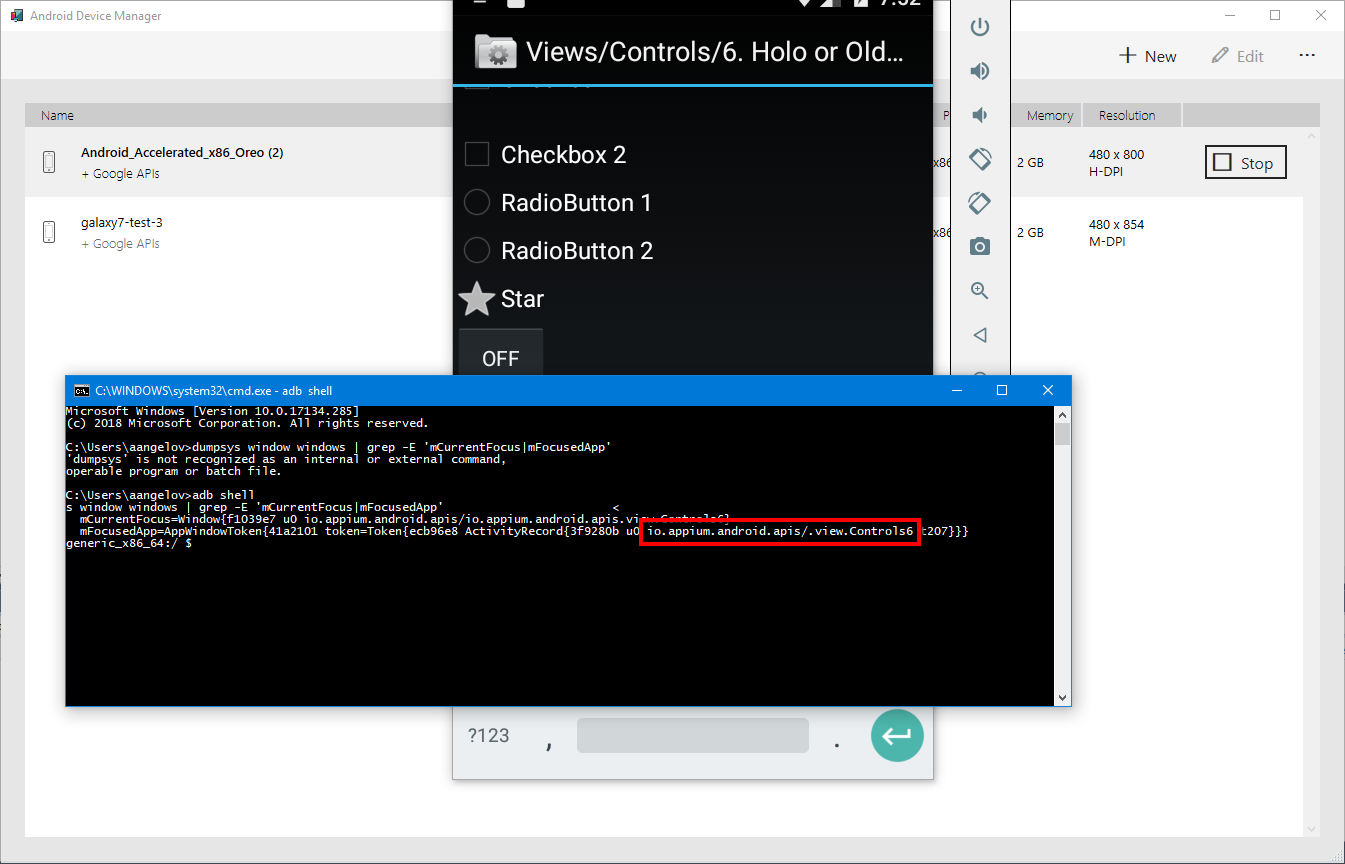
Start Android App in Emulator
You need to make sure that the Appium server is started and listening on port 4723.
private static AndroidDriver<AndroidElement> _driver;

public static void ClassInitialize(TestContext context)
{
    string testAppPath = Path.Combine(AppDomain.CurrentDomain.BaseDirectory, "Resources", "ApiDemos-debug.apk");
    var desiredCaps = new AppiumOptions();
    desiredCaps.AddAdditionalCapability(MobileCapabilityType.DeviceName, "Android_Accelerated_x86_Oreo");
    desiredCaps.AddAdditionalCapability(AndroidMobileCapabilityType.AppPackage, "io.appium.android.apis");
    desiredCaps.AddAdditionalCapability(MobileCapabilityType.PlatformName, "Android");
    desiredCaps.AddAdditionalCapability(MobileCapabilityType.PlatformVersion, "7.1");
    desiredCaps.AddAdditionalCapability(AndroidMobileCapabilityType.AppActivity, ".ApiDemos");
    desiredCaps.AddAdditionalCapability(MobileCapabilityType.App, testAppPath);
    _driver = new AndroidDriver<AndroidElement>(new Uri("http://127.0.0.1:4723/wd/hub"), desiredCaps);
    _driver.CloseApp();
}

public void TestInitialize()
{
    if (_driver != null)
    {
        _driver.LaunchApp();
        _driver.StartActivity("io.appium.android.apis", ".ApiDemos");
    }
}

public void TestCleanup()
{
    _driver?.CloseApp();
}
private static AndroidDriver<AndroidElement> _driver;

public static void ClassInitialize(TestContext context)
{
    string testAppPath = Path.Combine(AppDomain.CurrentDomain.BaseDirectory, "Resources", "ApiDemos-debug.apk");
    var desiredCaps = new AppiumOptions();
    desiredCaps.AddAdditionalCapability(MobileCapabilityType.DeviceName, "Android_Accelerated_x86_Oreo");
    desiredCaps.AddAdditionalCapability(AndroidMobileCapabilityType.AppPackage, "io.appium.android.apis");
    desiredCaps.AddAdditionalCapability(MobileCapabilityType.PlatformName, "Android");
    desiredCaps.AddAdditionalCapability(MobileCapabilityType.PlatformVersion, "7.1");
    desiredCaps.AddAdditionalCapability(AndroidMobileCapabilityType.AppActivity, ".ApiDemos");
    desiredCaps.AddAdditionalCapability(MobileCapabilityType.App, testAppPath);
    _driver = new AndroidDriver<AndroidElement>(new Uri("http://127.0.0.1:4723/wd/hub"), desiredCaps);
    _driver.CloseApp();
}

public void TestInitialize()
{
    if (_driver != null)
    {
        _driver.LaunchApp();
        _driver.StartActivity("io.appium.android.apis", ".ApiDemos");
    }
}

public void TestCleanup()
{
    _driver?.CloseApp();
}
private static AndroidDriver<AndroidElement> _driver;
public static void ClassInitialize(TestContext context)
{
string testAppPath = Path.Combine(AppDomain.CurrentDomain.BaseDirectory, "Resources", "ApiDemos-debug.apk");
var desiredCaps = new AppiumOptions();
desiredCaps.AddAdditionalCapability(MobileCapabilityType.DeviceName, "Android_Accelerated_x86_Oreo");
desiredCaps.AddAdditionalCapability(AndroidMobileCapabilityType.AppPackage, "io.appium.android.apis");
desiredCaps.AddAdditionalCapability(MobileCapabilityType.PlatformName, "Android");
desiredCaps.AddAdditionalCapability(MobileCapabilityType.PlatformVersion, "7.1");
desiredCaps.AddAdditionalCapability(AndroidMobileCapabilityType.AppActivity, ".ApiDemos");
desiredCaps.AddAdditionalCapability(MobileCapabilityType.App, testAppPath);
_driver = new AndroidDriver<AndroidElement>(new Uri("http://127.0.0.1:4723/wd/hub"), desiredCaps);
_driver.CloseApp();
}
public void TestInitialize()
{
if (_driver != null)
{
_driver.LaunchApp();
_driver.StartActivity("io.appium.android.apis", ".ApiDemos");
}
}
public void TestCleanup()
{
_driver?.CloseApp();
}After the driver is initialised we closed if the app is open. Then before each test, we launch the app and open the desired activity.
Start Appium Service with Code
Instead of starting Appium server manually, we can start it from code.
Note: However, at the time of writing this is working on Windows but crashing on Mac.
var args = new OptionCollector().AddArguments(GeneralOptionList.PreLaunch());
_appiumLocalService = new AppiumServiceBuilder().UsingAnyFreePort().Build();
_appiumLocalService.Start();
Get Path to Test App
The apk file is set to be copied on build in the folder Resources. This is how we get the path.
string testAppPath = Path.Combine(AppDomain.CurrentDomain.BaseDirectory, "Resources", "ApiDemos-debug.apk");Initialize Appium Options
string testAppPath = Path.Combine(AppDomain.CurrentDomain.BaseDirectory, "Resources", "ApiDemos-debug.apk");
var appiumOptions = new AppiumOptions();
appiumOptions.AddAdditionalCapability(MobileCapabilityType.DeviceName, "Android_Accelerated_x86_Oreo");
appiumOptions.AddAdditionalCapability(AndroidMobileCapabilityType.AppPackage, "io.appium.android.apis");
appiumOptions.AddAdditionalCapability(MobileCapabilityType.PlatformName, "Android");
appiumOptions.AddAdditionalCapability(MobileCapabilityType.PlatformVersion, "7.1");
appiumOptions.AddAdditionalCapability(AndroidMobileCapabilityType.AppActivity, ".ApiDemos");
appiumOptions.AddAdditionalCapability(MobileCapabilityType.App, testAppPath);
Find Android Locators
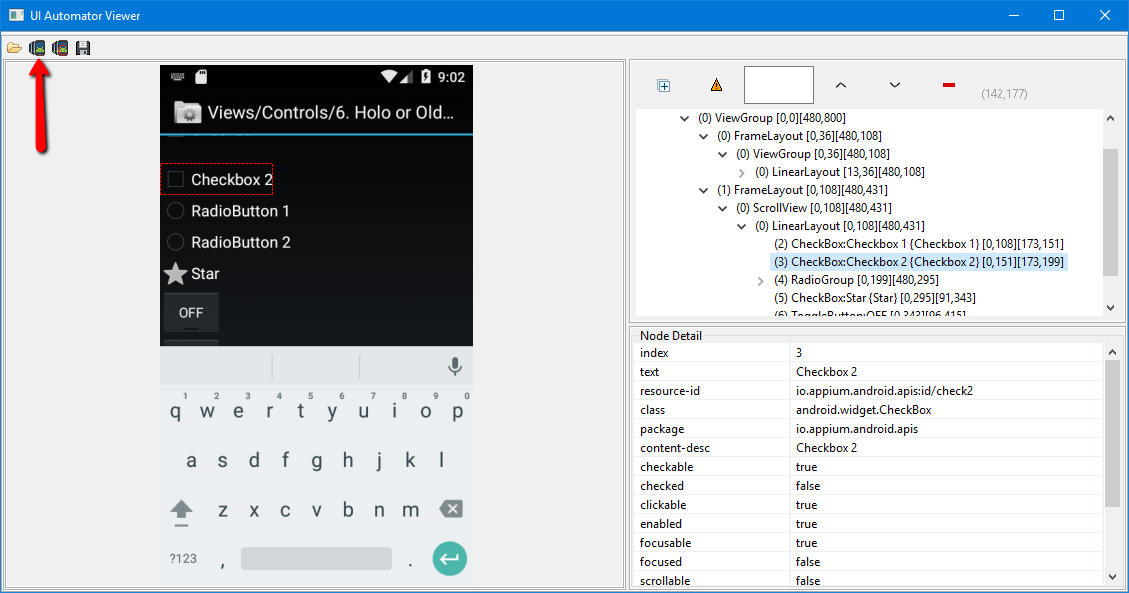
Using the UIAutomator Viewer, you can find the elements you are looking for. The UIAutomator Viewer tool provides a convenient GUI to scan and analyze the UI components currently displayed on an Android device. You can use this tool to inspect the layout hierarchy and view the properties of UI components that are visible on the foreground of the device. This information lets you create more fine-grained tests using UI Automator, for example by creating a UI selector that matches a specific visible property. The UIAutomator Viewer tool is located in the
Find Android Locators with Appium Desktop
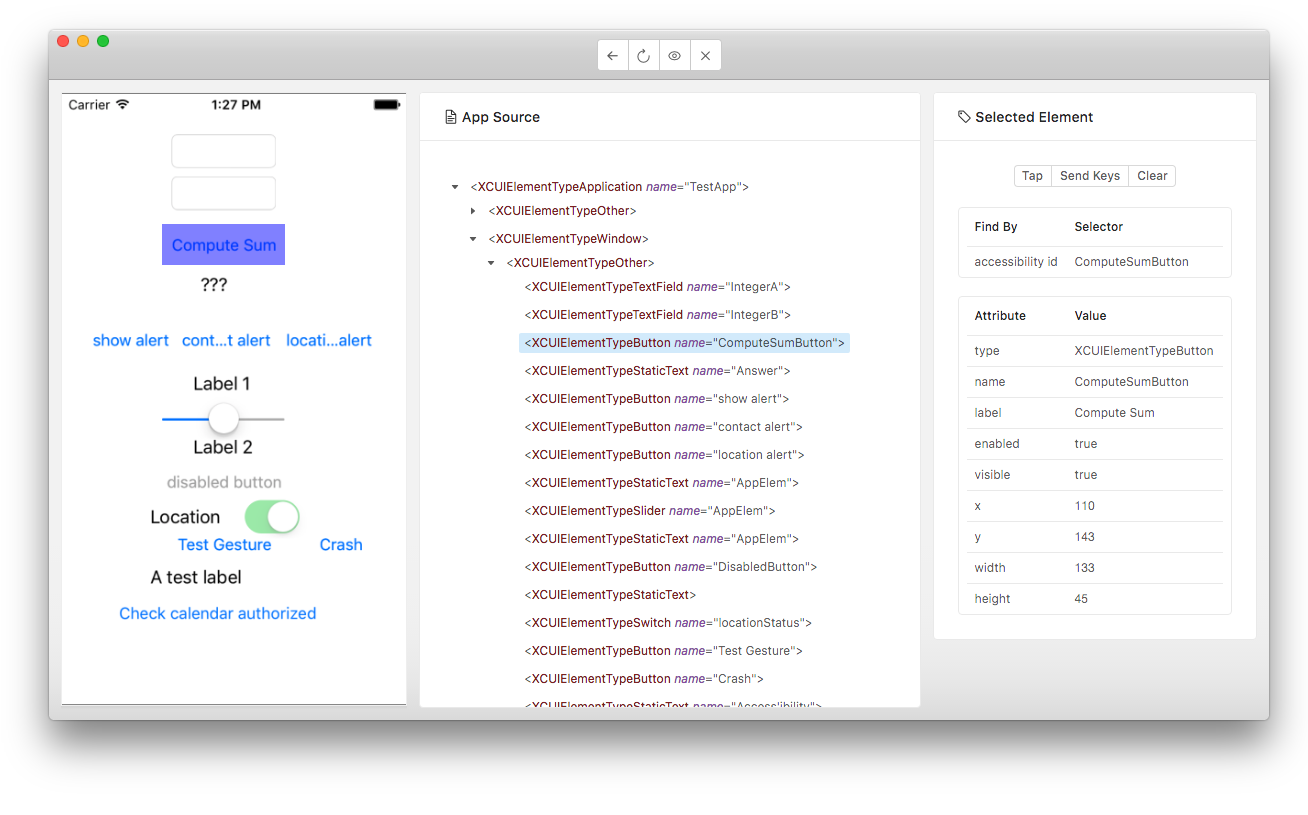
Appium provides you with a neat tool that allows you to find the elements you’re looking for. With Appium Desktop you can find any item and its locators by either clicking the element on the screenshot image or locating it in the source tree.
After launching Appium Desktop and starting a session, you can locate any element in the source.
Locating Elements with Appium
- By ID
AndroidElement button = _driver.FindElementById("button");- By Class
AndroidElement checkBox = _driver.FindElementByClassName("android.widget.CheckBox");- By XPath
AndroidElement thirdButton = _driver.FindElementByXPath("//*[@resource-id='com.example.android.apis:id/button']");- By AndroidUIAutomator
AndroidElement secondButton = _driver.FindElementByAndroidUIAutomator("new UiSelector().textContains("BUTTO");");Locate Elements using AndroidDriver
public void LocatingElementsTest()
{
    AndroidElement button = _driver.FindElementById("button");
    button.Click();
    AndroidElement checkBox = _driver.FindElementByClassName("android.widget.CheckBox");
    checkBox.Click();
    AndroidElement secondButton = _driver.FindElementByAndroidUIAutomator("new UiSelector().textContains("BUTTO");");
    secondButton.Click();
    AndroidElement thirdButton = _driver.FindElementByXPath("//*[@resource-id='com.example.android.apis:id/button']");
    thirdButton.Click();
}
You just need to call the FindElementBy methods of the AndroidDriver to locate the elements.
Locate Elements inside Parent
public void LocatingElementInsideAnotherElementTest()
{
    var mainElement = _driver.FindElementById("decor_content_parent");
    var button = mainElement.FindElementById("button");
    button.Click();
    var checkBox = mainElement.FindElementByClassName("android.widget.CheckBox");
    checkBox.Click();
    var thirdButton = mainElement.FindElementByXPath("//*[@resource-id='com.example.android.apis:id/button']");
    thirdButton.Click();
}
You have similar FindElementBy methods on element level so that you can find elements inside other elements.
Gesture Actions in Appium
To perform any touch actions, we use the special TouchAction class. You can use it to do a series of steps simultaneously.
Swipe
public void SwipeTest()
{
    _driver.StartActivity("io.appium.android.apis", ".graphics.FingerPaint");
    ITouchAction touchAction = new TouchAction(_driver);
    var element = _driver.FindElementById("android:id/content");
    Point point = element.Coordinates.LocationInDom;
    Size size = element.Size;
    touchAction
    .Press(point.X + 5, point.Y + 5)
    .Wait(200).MoveTo(point.X + size.Width - 5, point.Y + size.Height - 5)
    .Release()
    .Perform();
}
MoveTo
public void MoveToTest()
{
    ITouchAction touchAction = new TouchAction(_driver);
    var element = _driver.FindElementById("android:id/content");
    Point point = element.Coordinates.LocationInDom;
    touchAction.MoveTo(point.X, point.Y).Perform();
}
Tap
public void TapTest()
{
    ITouchAction touchAction = new TouchAction(_driver);
    var element = _driver.FindElementById("android:id/content");
    Point point = element.Coordinates.LocationInDom;
    touchAction.Tap(point.X, point.Y, 2).Perform();
}