In this article from the series Automation Tools, I am going to guide you on how you can set up a Bitbucket Pipelines job for a Selenium C# project, run your Selenium tests, and display the report with the test results, all that without ever leaving the Bitbucket website.
What Is Bitbucket Pipelines?
Bitbucket Pipelines is one of the most recent workflow mechanisms that are quick and easy to set up directly from the Bitbucket repository. It allows you to automatically build, test, and even deploy your code based on a configuration file in your repository. Essentially, it creates containers in the cloud for you. Inside these containers, you can run commands (like you might on a local machine) but with all the advantages of a fresh system, customized and configured for your needs.
Why Do You Need CI/CD?
Definition
CI/CD, short for Continuous Integration and Continuous Delivery/Deployment, is a collection of practices and operating principles that enable teams to deliver code changes more frequently and reliably. The implementation is usually called CI/CD pipeline
Note
Continuous Integration establishes a consistent automated way of building, packaging, and testing applications. This helps teams deliver code changes more frequently, which improves collaboration and software quality.
Note
Continuous Delivery starts where Continuous Integration ends. It automates the delivery of applications to selected environments. For example, teams usually work on multiple environments (development, testing, staging, production), and Continuous Delivery helps with an automated way to push code changes to them.
The logic behind using such principles is, so teams commit smaller code changes more frequently. Continuous Integration usually checks if the code builds and the tests run successfully on each commit to the repository, so it’s easier to identify defects earlier and improve software quality. Continuous Deployment helps those changes get to the production environment seamlessly when all the tests have been carried out.
Setting Up The Tests
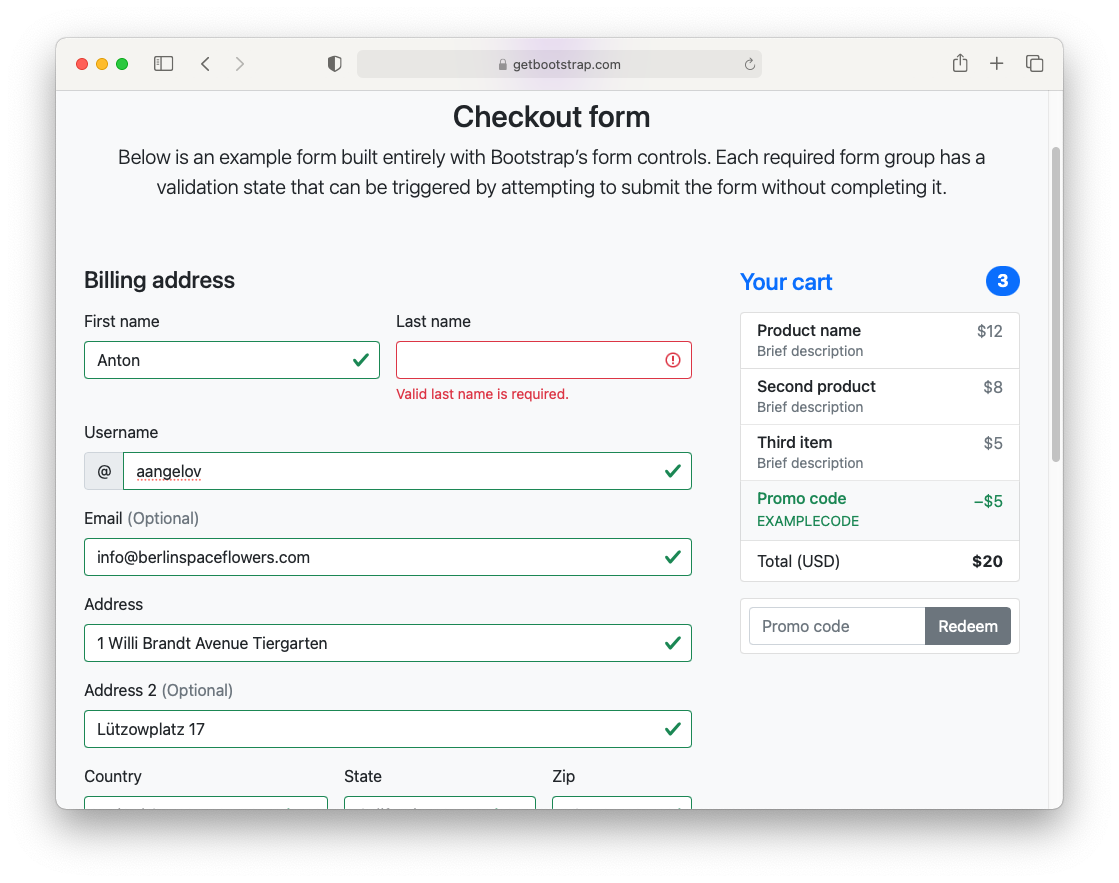
In the example, we’re going to build a simple NUnit .NET Core project, which will test the proper validation of the fields of Bootstrap 5’s example Checkout form. We’re checking if the appropriate error message is displayed on each required field, if it is empty when submitting and if the form submits if all the fields have valid info.
I create a page object split into 3 files using partial classes. We have one file for holding all actions: Map, which contains all elements with their respective locators, and the last one with all assertions.
Actions
public partial class CheckoutPage
{
    private const string URL = "https://getbootstrap.com/docs/5.0/examples/checkout/";
    private IWebDriver _driver;

    public CheckoutPage(IWebDriver driver)
    {
        _driver = driver;
    }

    public void Navigate()
    {
        _driver.Navigate().GoToUrl(URL);
    }

    public void FillInfo(ClientInfo clientInfo)
    {
        FirstName.SendKeys(clientInfo.FirstName);
        LastName.SendKeys(clientInfo.LastName);
        Username.SendKeys(clientInfo.Username);
        Email.SendKeys(clientInfo.Email);
        Address1.SendKeys(clientInfo.Address1);
        Address2.SendKeys(clientInfo.Address2);
        Country.SelectByIndex(clientInfo.Country);
        State.SelectByIndex(clientInfo.State);
        Zip.SendKeys(clientInfo.Zip);
        CardName.SendKeys(clientInfo.CardName);
        CardNumber.SendKeys(clientInfo.CardNumber);
        CardExpiration.SendKeys(clientInfo.CardExpiration);
        CardCVV.SendKeys(clientInfo.CardCVV);
        ClickSubmitButton();
    }

    private void ClickSubmitButton()
    {
        ((IJavaScriptExecutor)_driver).ExecuteScript("arguments[0].click();", SubmitButton);
    }
}
We pass the initialized driver through the constructor, and the most important method here is FillInfo. Finally, we give as a parameter the client information that we need to set into the form. I used the C# 9.0 record to ease the process.
namespace BitbucketPipelines.Pages
{
    public record ClientInfo(
        string FirstName,
        string LastName,
        string Username,
        string Email,
        string Address1,
        string Address2,
        int Country,
        int State,
        string Zip,
        string CardName,
        string CardNumber,
        string CardExpiration,
        string CardCVV
    );
}
A record is still a class, but the record keyword imbues it with several additional value-like behaviors. Generally speaking, records are defined by their contents, not their identity. In this regard, records are much closer to structs, but records are still reference types. While records can be mutable, they are primarily built for better supporting immutable data models.
Map
public partial class CheckoutPage {
    public IWebElement FirstName => _driver.FindElement(By.Id("firstName"));
    public IWebElement FirstNameValidation =>
        _driver.FindElement(By.CssSelector("#firstName ~ .invalid-feedback"));
    public IWebElement LastName => _driver.FindElement(By.Id("lastName"));
    public IWebElement LastNameValidation =>
        _driver.FindElement(By.CssSelector("#lastName ~ .invalid-feedback"));
    public IWebElement Username => _driver.FindElement(By.Id("username"));
    public IWebElement UsernameValidation =>
        _driver.FindElement(By.CssSelector("#username ~ .invalid-feedback"));
    public IWebElement Email => _driver.FindElement(By.Id("email"));
    public IWebElement EmailValidation =>
        _driver.FindElement(By.CssSelector("#email ~ .invalid-feedback"));
    public IWebElement Address1 => _driver.FindElement(By.Id("address"));
    public IWebElement Address1Validation =>
        _driver.FindElement(By.CssSelector("#address ~ .invalid-feedback"));
    public IWebElement Address2 => _driver.FindElement(By.Id("address2"));
    public SelectElement Country => new SelectElement(_driver.FindElement(By.Id("country")));
    public IWebElement CountryValidation =>
        _driver.FindElement(By.CssSelector("#country ~ .invalid-feedback"));
    public SelectElement State => new SelectElement(_driver.FindElement(By.Id("state")));
    public IWebElement StateValidation =>
        _driver.FindElement(By.CssSelector("#state ~ .invalid-feedback"));
    public IWebElement Zip => _driver.FindElement(By.Id("zip"));
    public IWebElement ZipValidation =>
        _driver.FindElement(By.CssSelector("#zip ~ .invalid-feedback"));
    public IWebElement CardName => _driver.FindElement(By.Id("cc-name"));
    public IWebElement CardNameValidation =>
        _driver.FindElement(By.CssSelector("#cc-name ~ .invalid-feedback"));
    public IWebElement CardNumber => _driver.FindElement(By.Id("cc-number"));
    public IWebElement CardNumberValidation =>
        _driver.FindElement(By.CssSelector("#cc-number ~ .invalid-feedback"));
    public IWebElement CardExpiration => _driver.FindElement(By.Id("cc-expiration"));
    public IWebElement CardExpirationValidation =>
        _driver.FindElement(By.CssSelector("#cc-expiration ~ .invalid-feedback"));
    public IWebElement CardCVV => _driver.FindElement(By.Id("cc-cvv"));
    public IWebElement CardCVVValidation =>
        _driver.FindElement(By.CssSelector("#cc-cvv ~ .invalid-feedback"));
    public IWebElement SubmitButton =>
        _driver.FindElement(By.XPath("//button[text()='Continue to checkout']"));
}
In the CheckoutPage.Map.cs file I defined all elements as expression-body-get properties. So if needed, you can easily update the locator in a single place. Also, for web pages with many elements, this approach better organizes the actions, elements, and assertions, instead of having everything in one huge file.
Assertions
public partial class CheckoutPage
{
    public void AssertFormSent()
    {
        Assert.True(_driver.Url.Contains("paymentMethod=on"), "Form not sent");
    }

    public void AssertFirstNameValidationDisplayed()
    {
        Assert.True(FirstNameValidation.Displayed);
    }

    public void AssertLastNameValidationDisplayed()
    {
        Assert.True(LastNameValidation.Displayed);
    }

    public void AssertUsernameValidationDisplayed()
    {
        Assert.True(UsernameValidation.Displayed);
    }

    public void AssertEmailValidationDisplayed()
    {
        Assert.True(EmailValidation.Displayed);
    }

    public void AssertAddress1ValidationDisplayed()
    {
        Assert.True(Address1Validation.Displayed);
    }

    public void AssertCountryValidationDisplayed()
    {
        Assert.True(CountryValidation.Displayed);
    }

    public void AssertStateValidationDisplayed()
    {
        Assert.True(StateValidation.Displayed);
    }

    public void AssertZipValidationDisplayed()
    {
        Assert.True(ZipValidation.Displayed);
    }

    public void AssertCardNameValidationDisplayed()
    {
        Assert.True(CardNameValidation.Displayed);
    }

    public void AssertCardNumberValidationDisplayed()
    {
        Assert.True(CardNumberValidation.Displayed);
    }

    public void AssertCardExpirationValidationDisplayed()
    {
        Assert.True(CardExpirationValidation.Displayed);
    }

    public void AssertCardCVVValidationDisplayed()
    {
        Assert.True(CardCVVValidation.Displayed);
    }
}
For a more detailed overview and usage of many more design patterns and best practices in automated testing, stay tuned for my upcoming book “Design Patterns for High-Quality Automated Tests, C# Edition, High-Quality Tests Attributes, and Best Practices”. It will be published at the end of February. You can read part of three of the chapters:
Defining High-Quality Test Attributes for Automated Tests
Benchmarking for Assessing Automated Test Components Performance
Generic Repository Design Pattern- Test Data Preparation
Checkout Tests
public class CheckoutTests
{
    private IWebDriver _driver;
    private CheckoutPage _checkoutPage;


    public void Setup()
    {
        new DriverManager().SetUpDriver(new ChromeConfig(), VersionResolveStrategy.MatchingBrowser);
        ChromeOptions options = new ChromeOptions();
        options.AddArguments("--headless");
        _driver = new ChromeDriver(options);
        _checkoutPage = new CheckoutPage(_driver);
        _checkoutPage.Navigate();
    }


    public void TearDown()
    {
        _driver.Quit();
    }


    public void FormSent_When_InfoValid()
    {
        var clientInfo = new ClientInfo(
            FirstName: "Anton",
            LastName: "Angelov",
            Username: "aangelov",
            Email: "info@berlinspaceflowers.com",
            Address1: "1 Willi Brandt Avenue Tiergarten",
            Address2: "Lützowplatz 17",
            Country: 1,
            State: 1,
            Zip: "10115",
            CardName: "Anton Angelov",
            CardNumber: "1234567890123456",
            CardExpiration: "12/23",
            CardCVV: "123"
        );
        _checkoutPage.FillInfo(clientInfo);
        _checkoutPage.AssertFormSent();
    }


    public void ValidatedFirstName_When_FirstNameNotSet()
    {
        var clientInfo = new ClientInfo(
            FirstName: "",
            LastName: "Angelov",
            Username: "aangelov",
            Email: "info@berlinspaceflowers.com",
            Address1: "1 Willi Brandt Avenue Tiergarten",
            Address2: "Lützowplatz 17",
            Country: 1,
            State: 1,
            Zip: "10115",
            CardName: "Anton Angelov",
            CardNumber: "1234567890123456",
            CardExpiration: "12/23",
            CardCVV: "123"
        );
        _checkoutPage.FillInfo(clientInfo);
        _checkoutPage.AssertFirstNameValidationDisplayed();
    }

    // rest of the tests

    public void ValidatedCardCVV_When_CardCVVNotSet()
    {
        var clientInfo = new ClientInfo(
            FirstName: "Anton",
            LastName: "Angelov",
            Username: "aangelov",
            Email: "info@berlinspaceflowers.com",
            Address1: "1 Willi Brandt Avenue Tiergarten",
            Address2: "Lützowplatz 17",
            Country: 1,
            State: 1,
            Zip: "10115",
            CardName: "Anton Angelov",
            CardNumber: "1234567890123456",
            CardExpiration: "12/23",
            CardCVV: ""
        );
        _checkoutPage.FillInfo(clientInfo);
        _checkoutPage.AssertCardCVVValidationDisplayed();
    }
}
Note
We’re setting up Chrome to run in the headless mode because the runners don’t display output and will probably crash the driver.
Note
We use the WebDriverManager library, which automatically detects my machine’s browser version and downloads the proper driver for it.
To be able to publish the results to Bitbucket Pipelines you need to install the JUnitTestLogger NuGet package.
Getting Started with Bitbucket Pipelines
1. Create a new Atlassian account and create a new Bitbucket account.
2. Create a new Bitbucket project
3. Create a new Git repository

4. Fill the required information
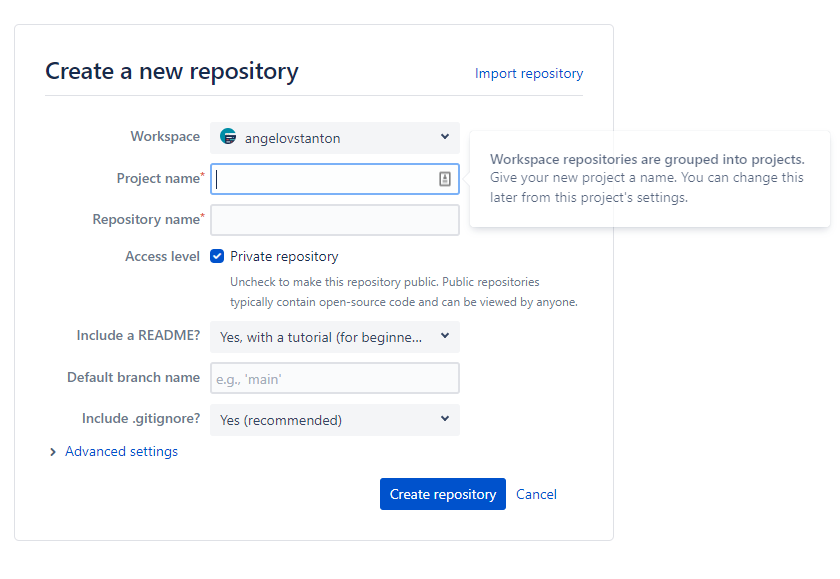
Below you can see the result.
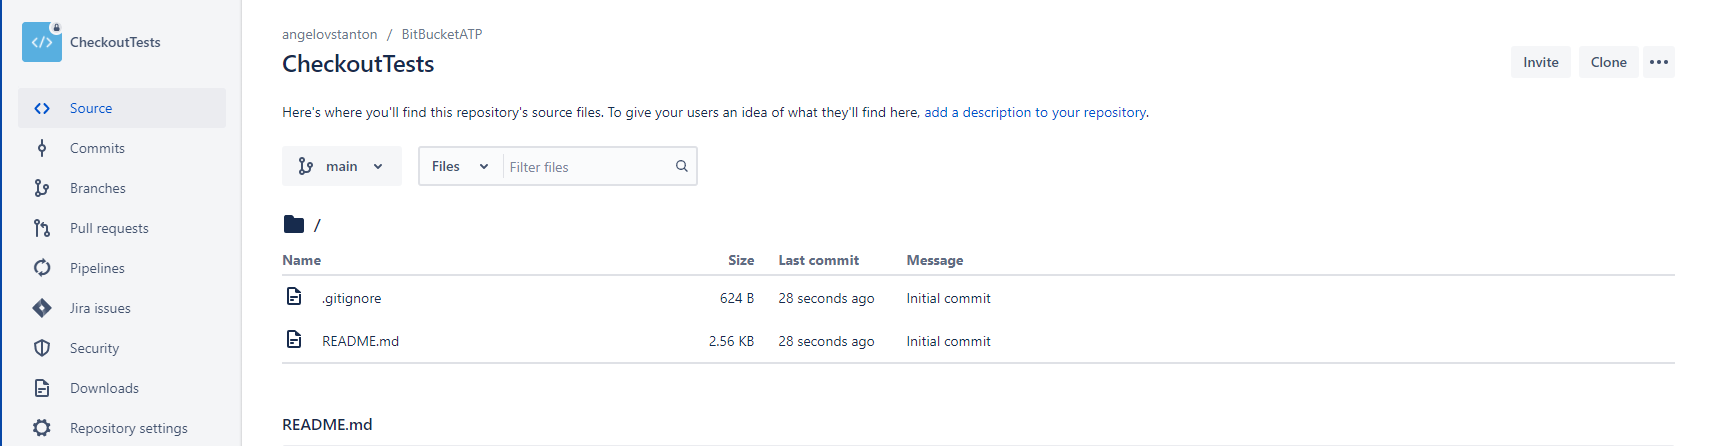
5. Click the Clone button and add the tests’ code
We are ready to proceed with creating a new pipeline that will execute the tests in CI.
6. Click the Pipelines button and select “Build and test a .Net code” pipeline template

7. To proceed with the setup, you need to enable the Two-step verification of your account. First, follow the steps described in the official documentation.
8. The .NET code template contains most of the things you need to download the source code and run the Selenium tests.
9. Edit the code before committing the file and change it with the following one:
image: "mcr.microsoft.com/dotnet/sdk:5.0"
pipelines: null
default:
  - parallel: null
  - step: null
name: Build and Test
caches:
  - dotnetcore
script:
  - "REPORTS_PATH=./test-reports/build_${BITBUCKET_BUILD_NUMBER}"
  - dotnet build CheckoutTests --configuration Debug
  - >-
    dotnet test CheckoutTests --no-build --configuration Debug
    --logger:"junit;LogFilePath=$REPORTS_PATH/junit.xml"
  - step: null
name: Lint the code
caches:
  - dotnetcore
script:
  - export SOLUTION_NAME=CheckoutTests
  - export REPORTS_PATH=linter-reports
artifacts:
  - linter-reports/**
10. After you make a push to the remote repository a new pipeline build will be triggered.
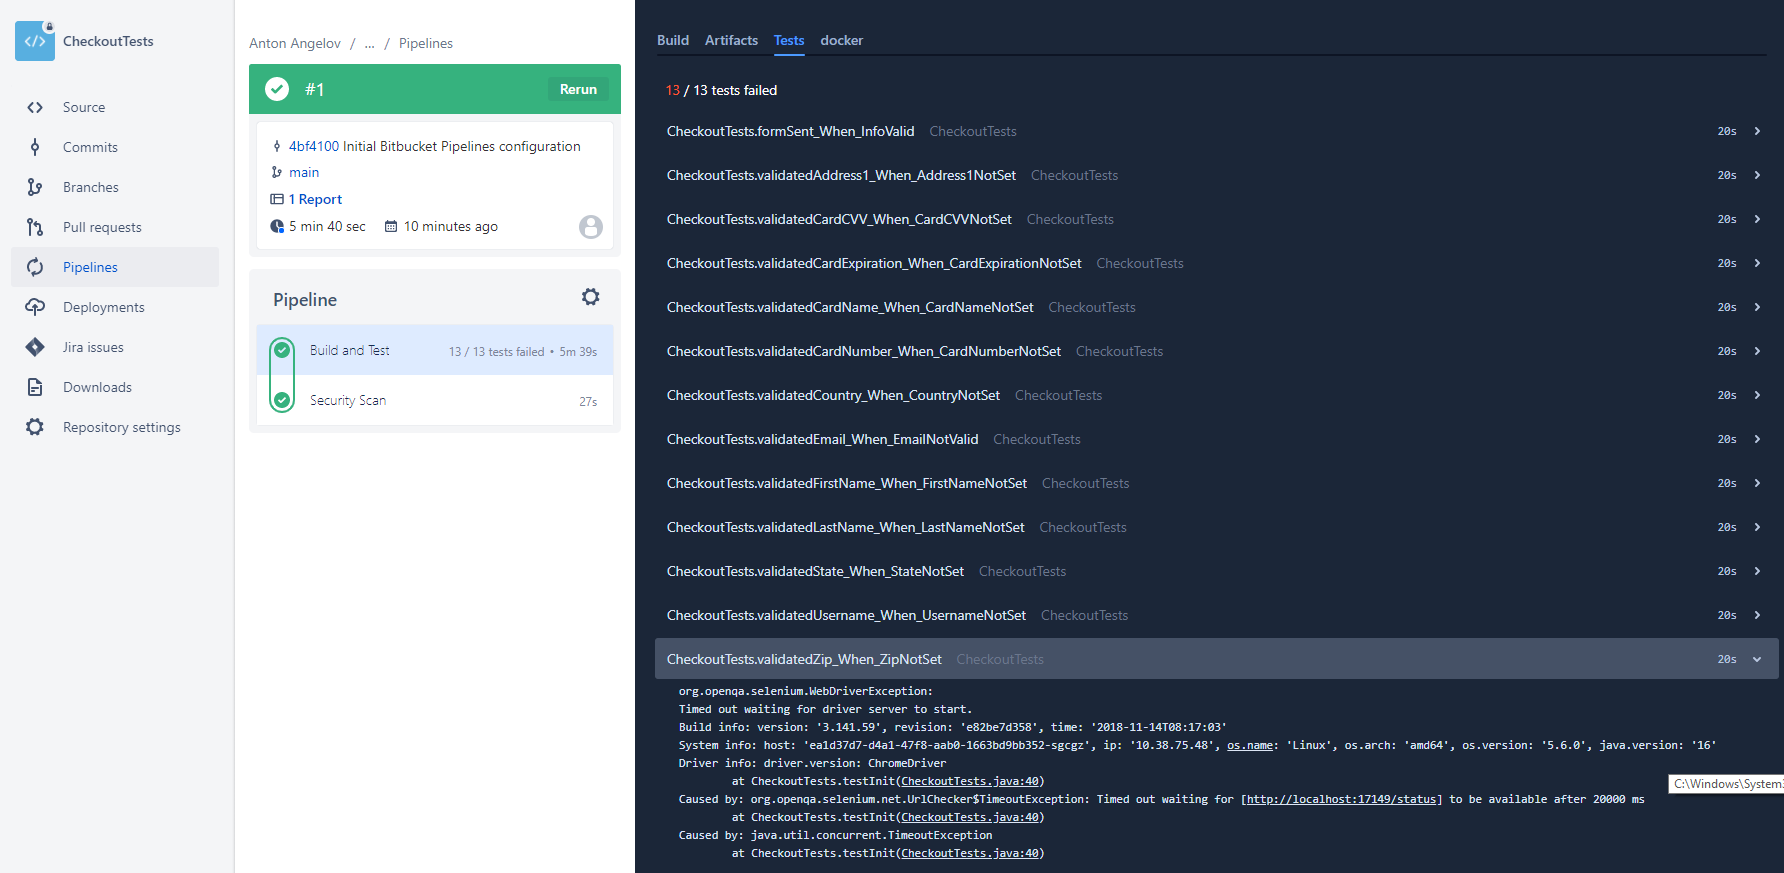
From my experience with Bitbucket Pipelines and other CI tools, I would suggest configuring your automated Selenium tests to run in the cloud, custom Selenium grid, or in Docker containers. Also, to ease the test failure analysis, consider integrating a solution such as Allure or ReportPortal since the information displayed in the builds here is insufficient. Also, you can check another superb AI-powered solution for healing automatically some of your tests - Healenium.
Summary
Bitbucket Pipelines is one of the most recent workflow mechanisms that are quick and easy to set up directly from the Bitbucket website. It allows you to automatically build, test, and even deploy your code based on a configuration file in your repository. Essentially, it creates containers in the cloud for you. Inside these containers, you can run commands.